Support
Setting up Marketo Forms for Marketing Attribution and UTM Tracking
Step-by-step setup to add Madlitics to Marketo forms so every response includes marketing channel, campaign, and landing page attribution.
Start capturing attribution →
Marketo forms are a core part of many demand generation programs, giving marketing teams control over lead capture, progressive profiling, and data routing. With Madlitics, you can extend those forms to capture attribution data automatically, so every submission carries the context behind how that lead arrived.
In this guide, I'll walk through how to connect Madlitics with Marketo forms. Once set up, every submission can include attribution data across paid/organic channels, campaign segmentations, and landing page data, giving you clearer visibility into what’s influencing lead generation inside Marketo.
💆 Heads-up: Make sure Madlitics is installed site-wide first, either through a script tag or tag manager. Marketo forms need the Madlitics script running on the page to populate attribution data into hidden fields. Installing Madlitics on your Website->
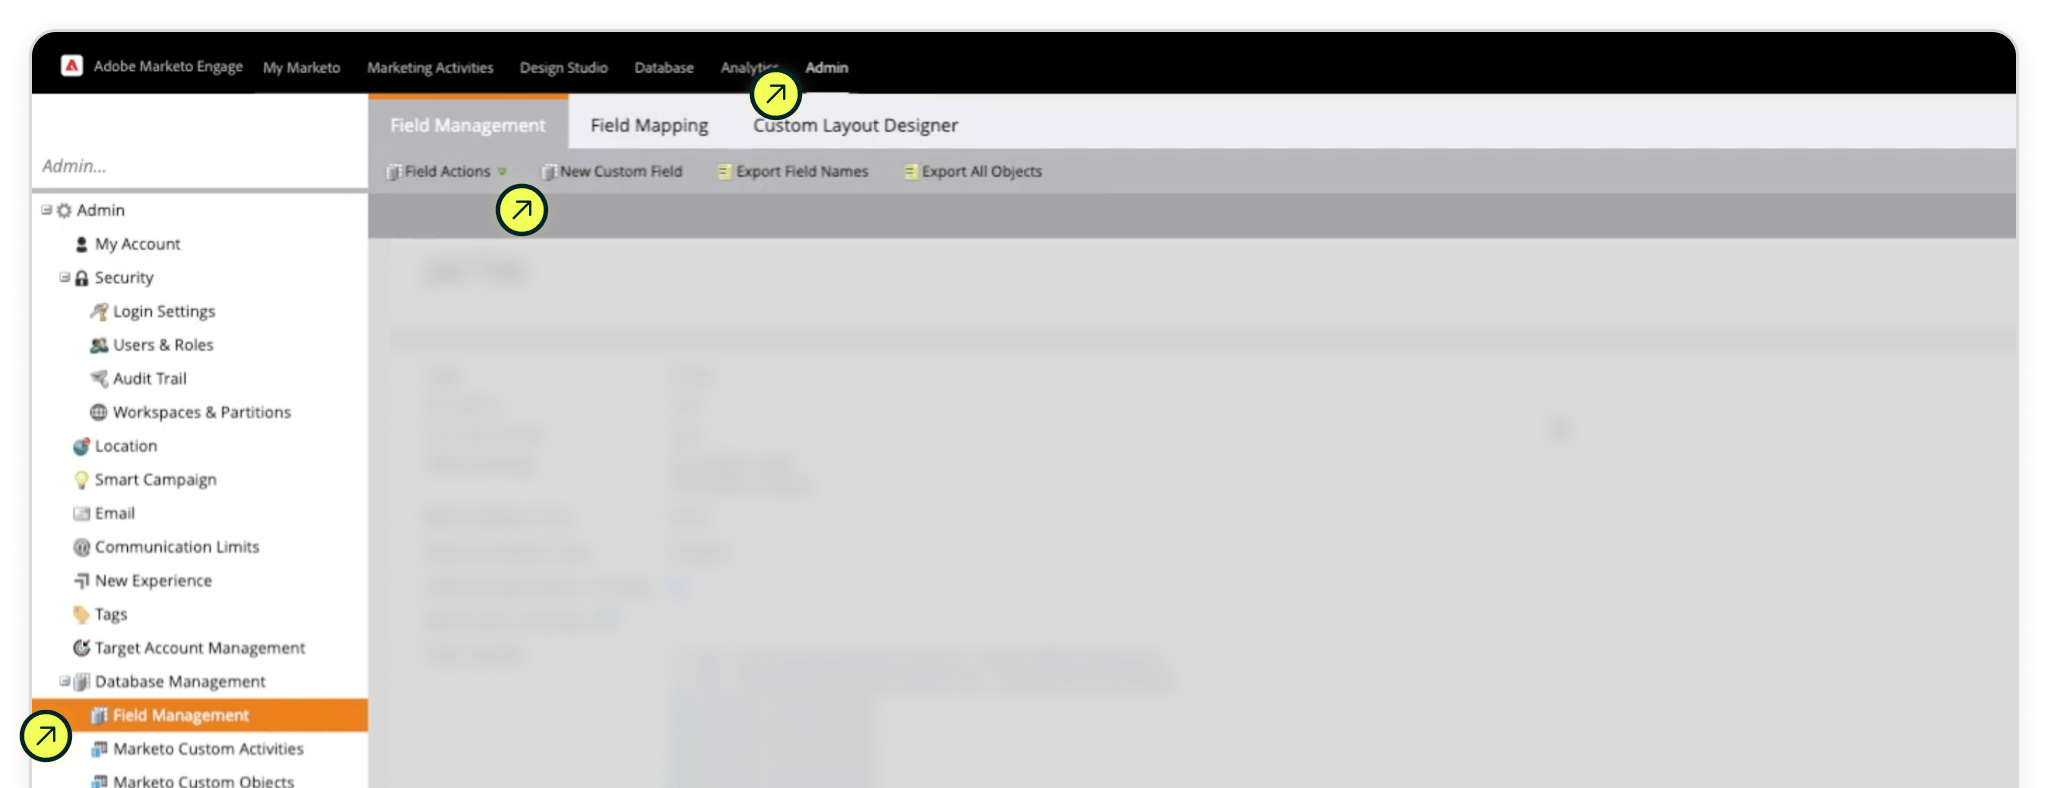
To capture attribution with Marketo, we first need to set up the fields that will hold that data. Marketo can only store values in fields that already exist, so you need to create them ahead of time.
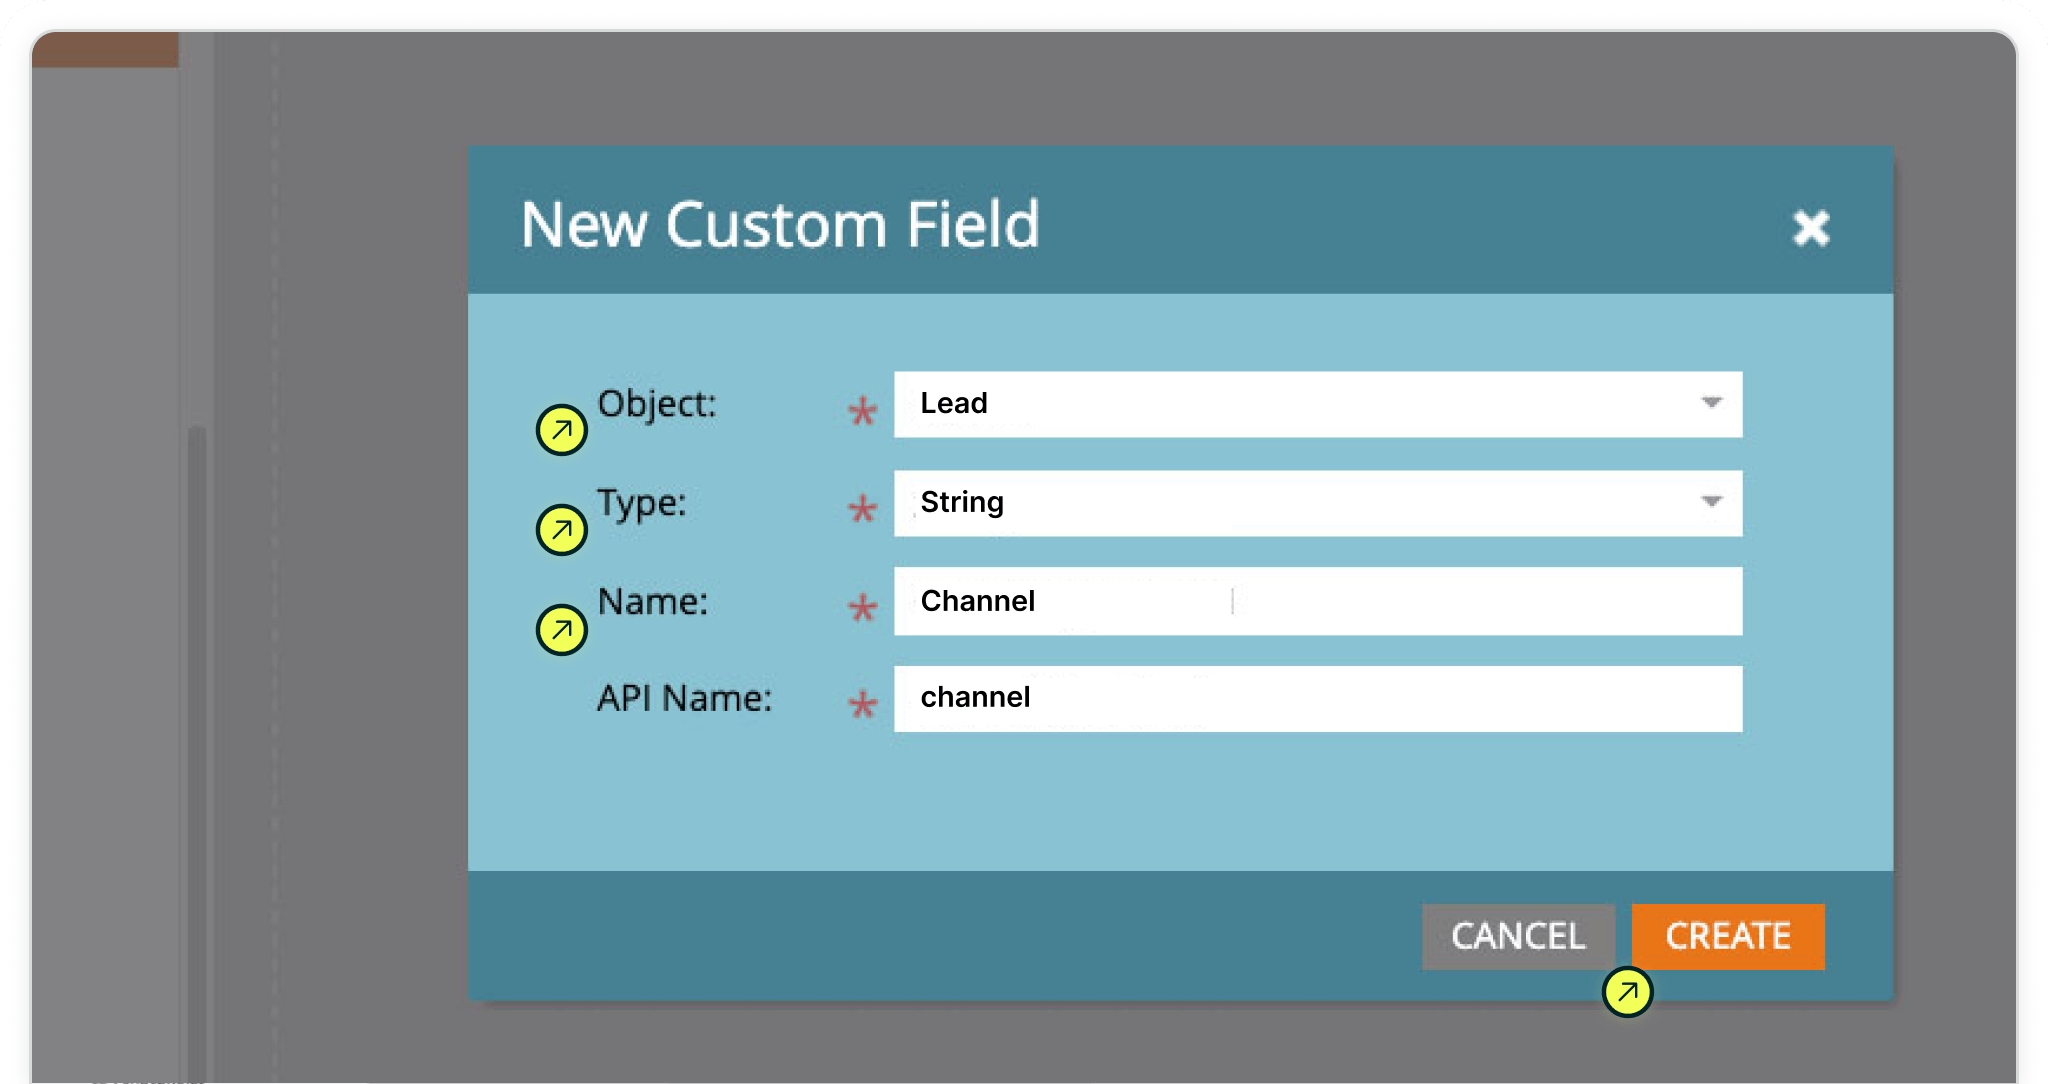
Go to the Admin area and click Field Management in the left‑hand menu. This is where you define the fields your forms and integrations can write into. Click New Custom Field, set the Object to 'Lead', Type to 'String', and add the unique Madlitics name for each field.
Field 1:
Object: Lead
Type: String
Name: Channel
API Name: channel
Repeat this process for all 7 Madlitics fields so, your Marketo forms can begin pushing attribution data into them.
Lead | Type: String | Name: Channel | API Name: channel
All custom fields use Object: Lead and Type: String.
Field 1:
Name: Channel
API Name: channel
Field 2:
Name: Segment 1
API Name: segment1
Field 3:
Name: Segment 2
API Name: segment2
Field 4:
Name: Segment 3
API Name: segment3
Field 5:
Name: Segment 4
API Name: segment4
Field 6:
Name: Landing Page
API Name: landingpage
Field 7:
Name: Landing Page Group
API Name: landingpagegroup
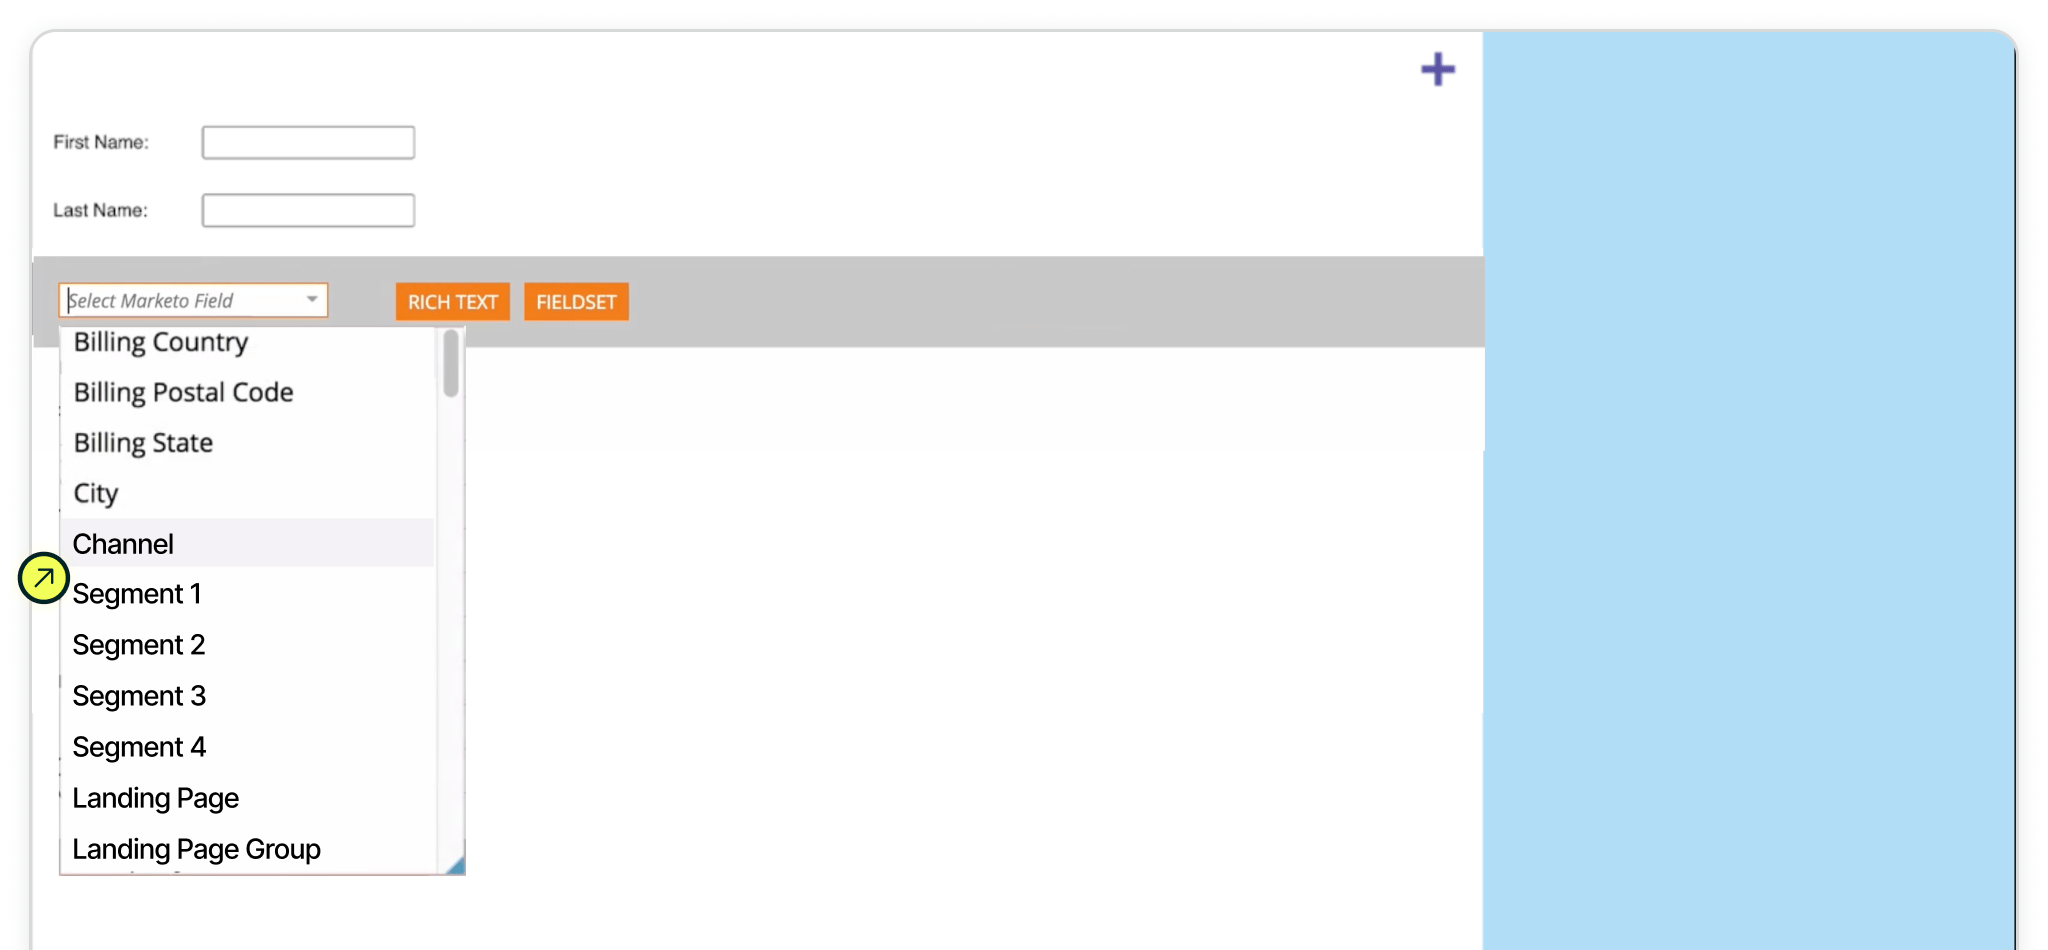
With your database fields created, the next step is adding them to your form so Marketo can capture attribution data on submission.
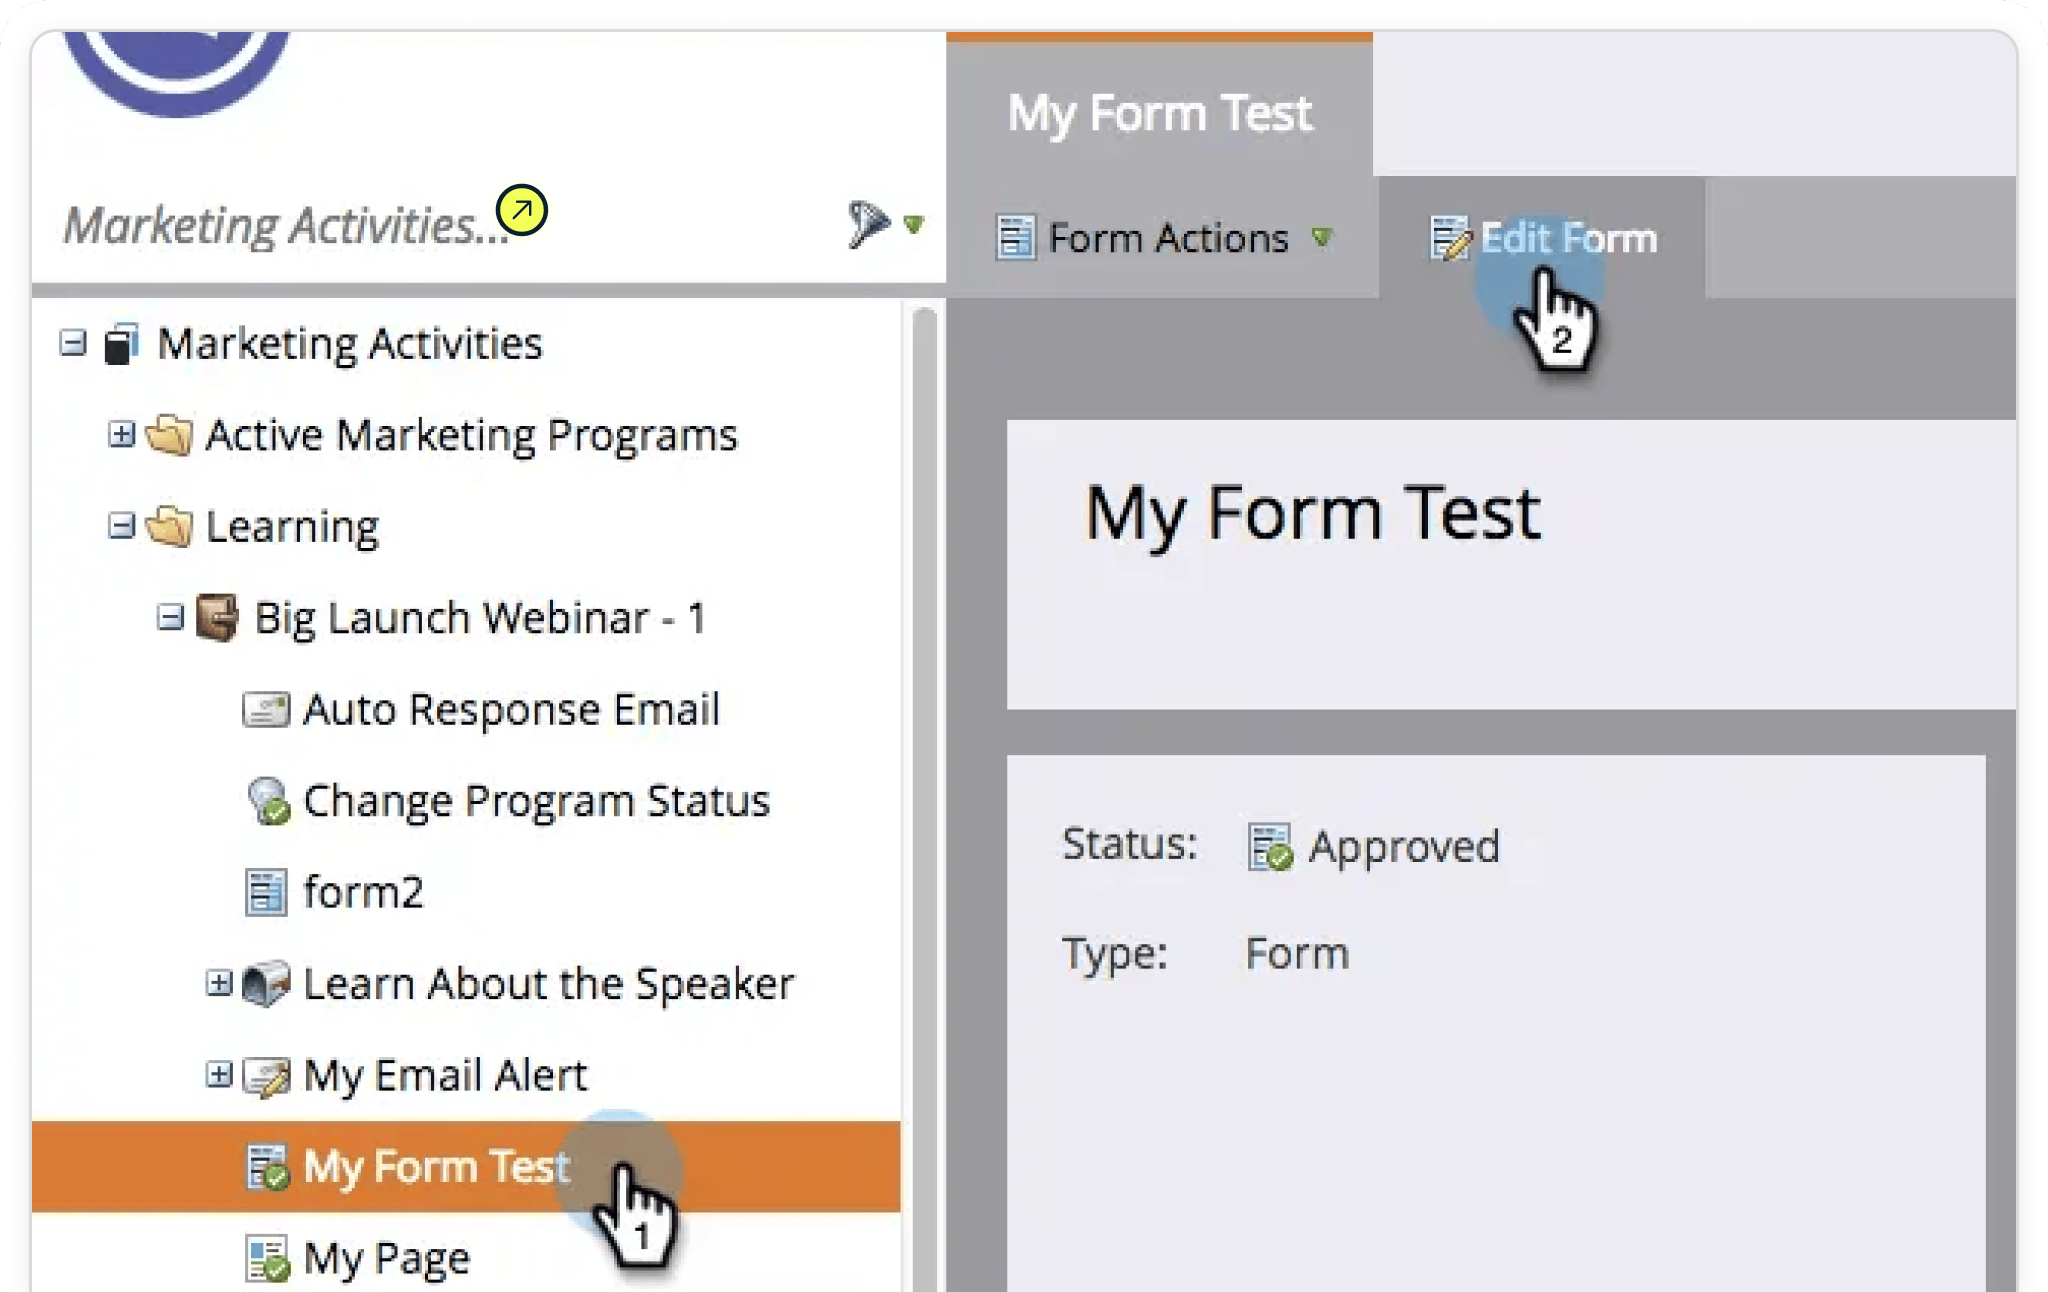
Go to Marketing Activities, locate the form you want to update, and click Edit Form. If you don’t have a form yet, create a new one by selecting New → New Local Asset → Form.
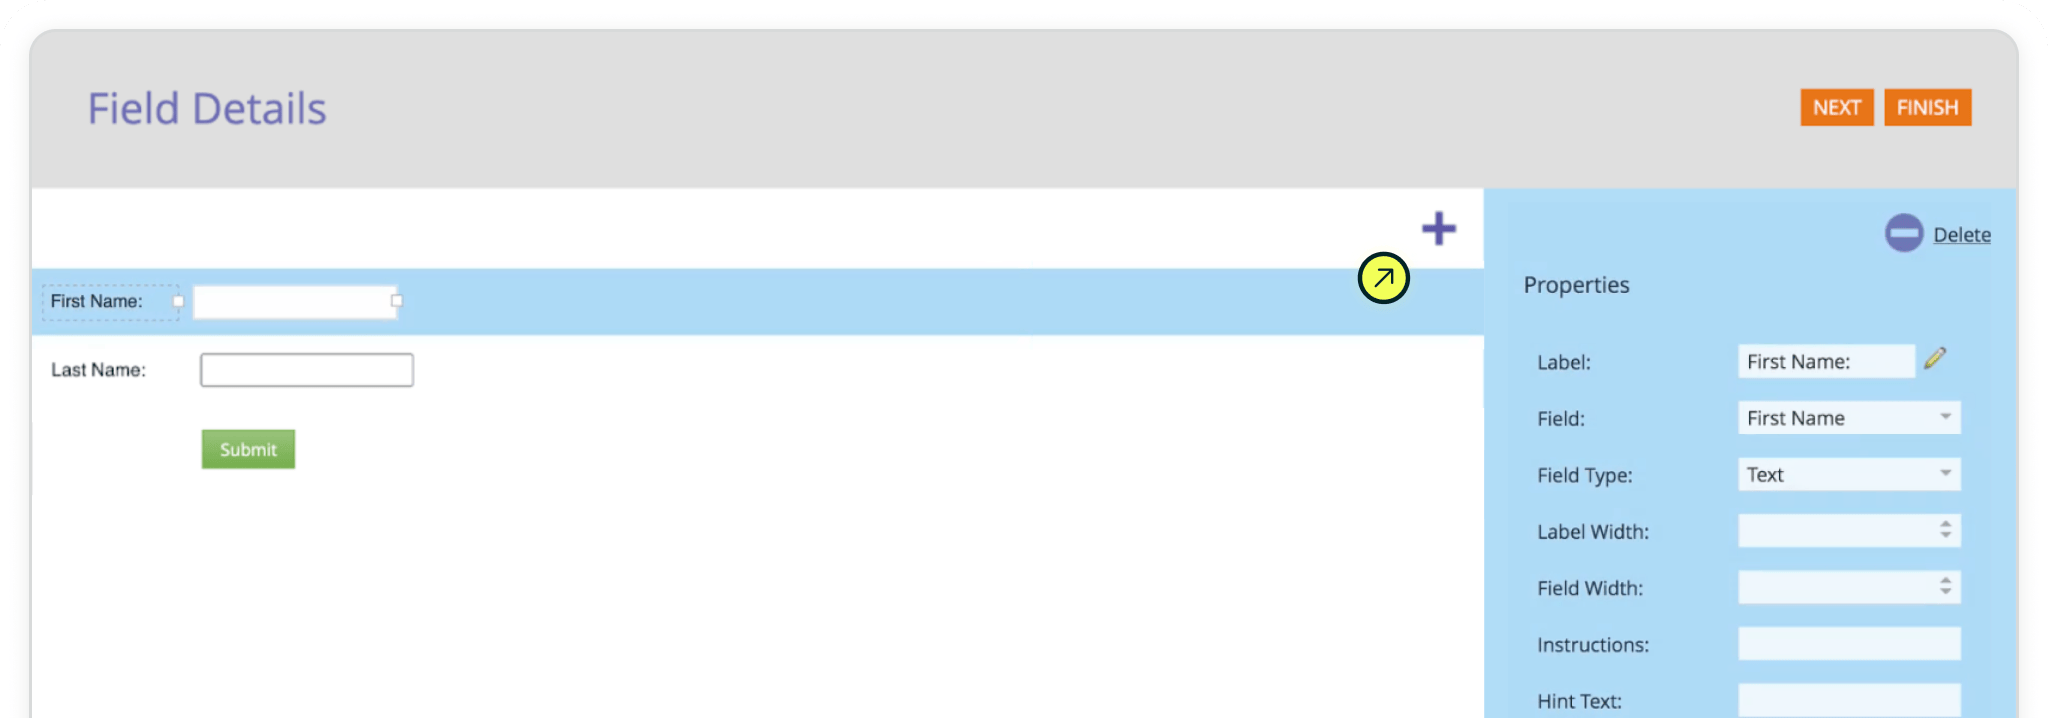
Inside the Form Editor, build your form as you normally would by adding standard fields like Name and Email. These fields will capture lead details, while your Madlitics fields will capture attribution data.
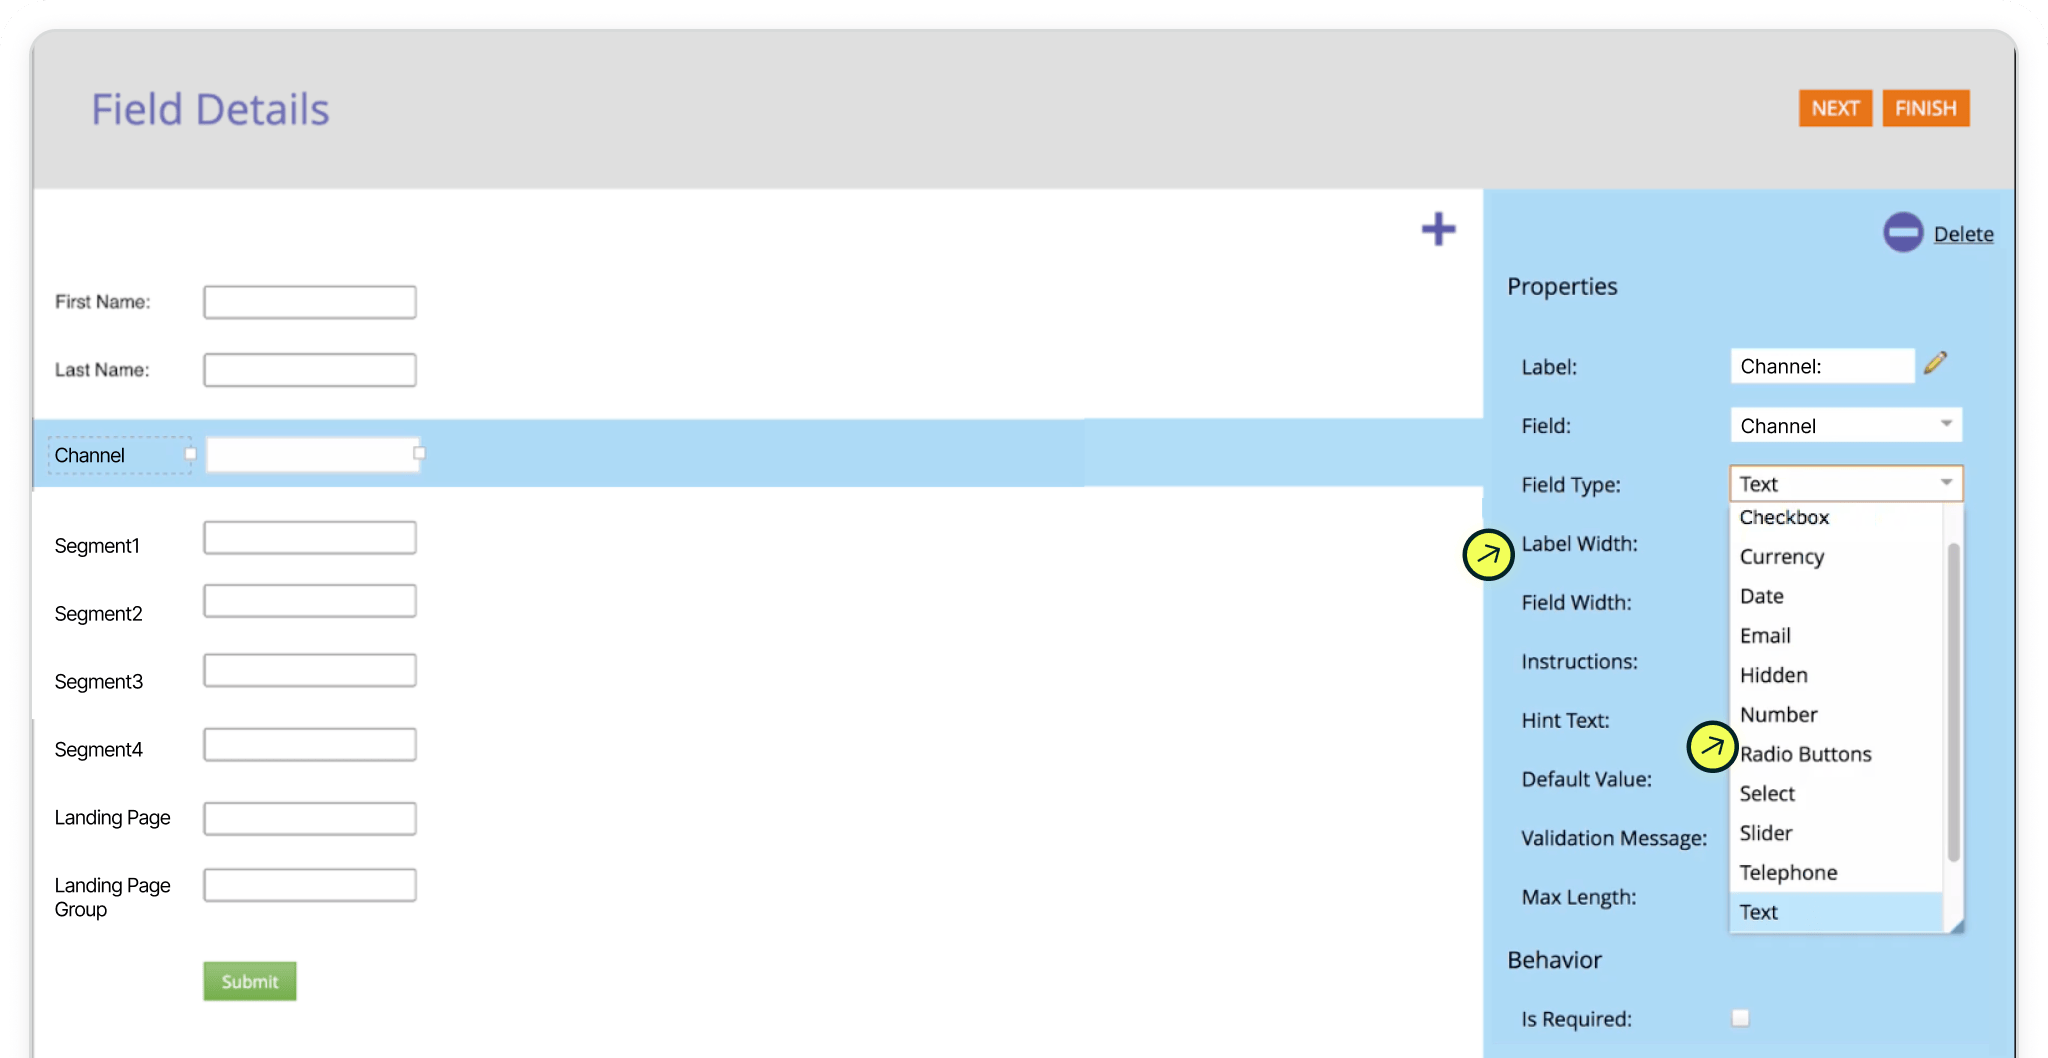
To add attribution fields, click the “+” button to insert a new field. In the field list, select Channel, which is one of the database fields you created earlier. This connects the form directly to the Marketo Lead record.
Repeat this process for each Madlitics field, including Segment(s) 1-4, Landing Page, and Landing Page Group. Each field should be added to the form so Marketo has a place to store the incoming data.

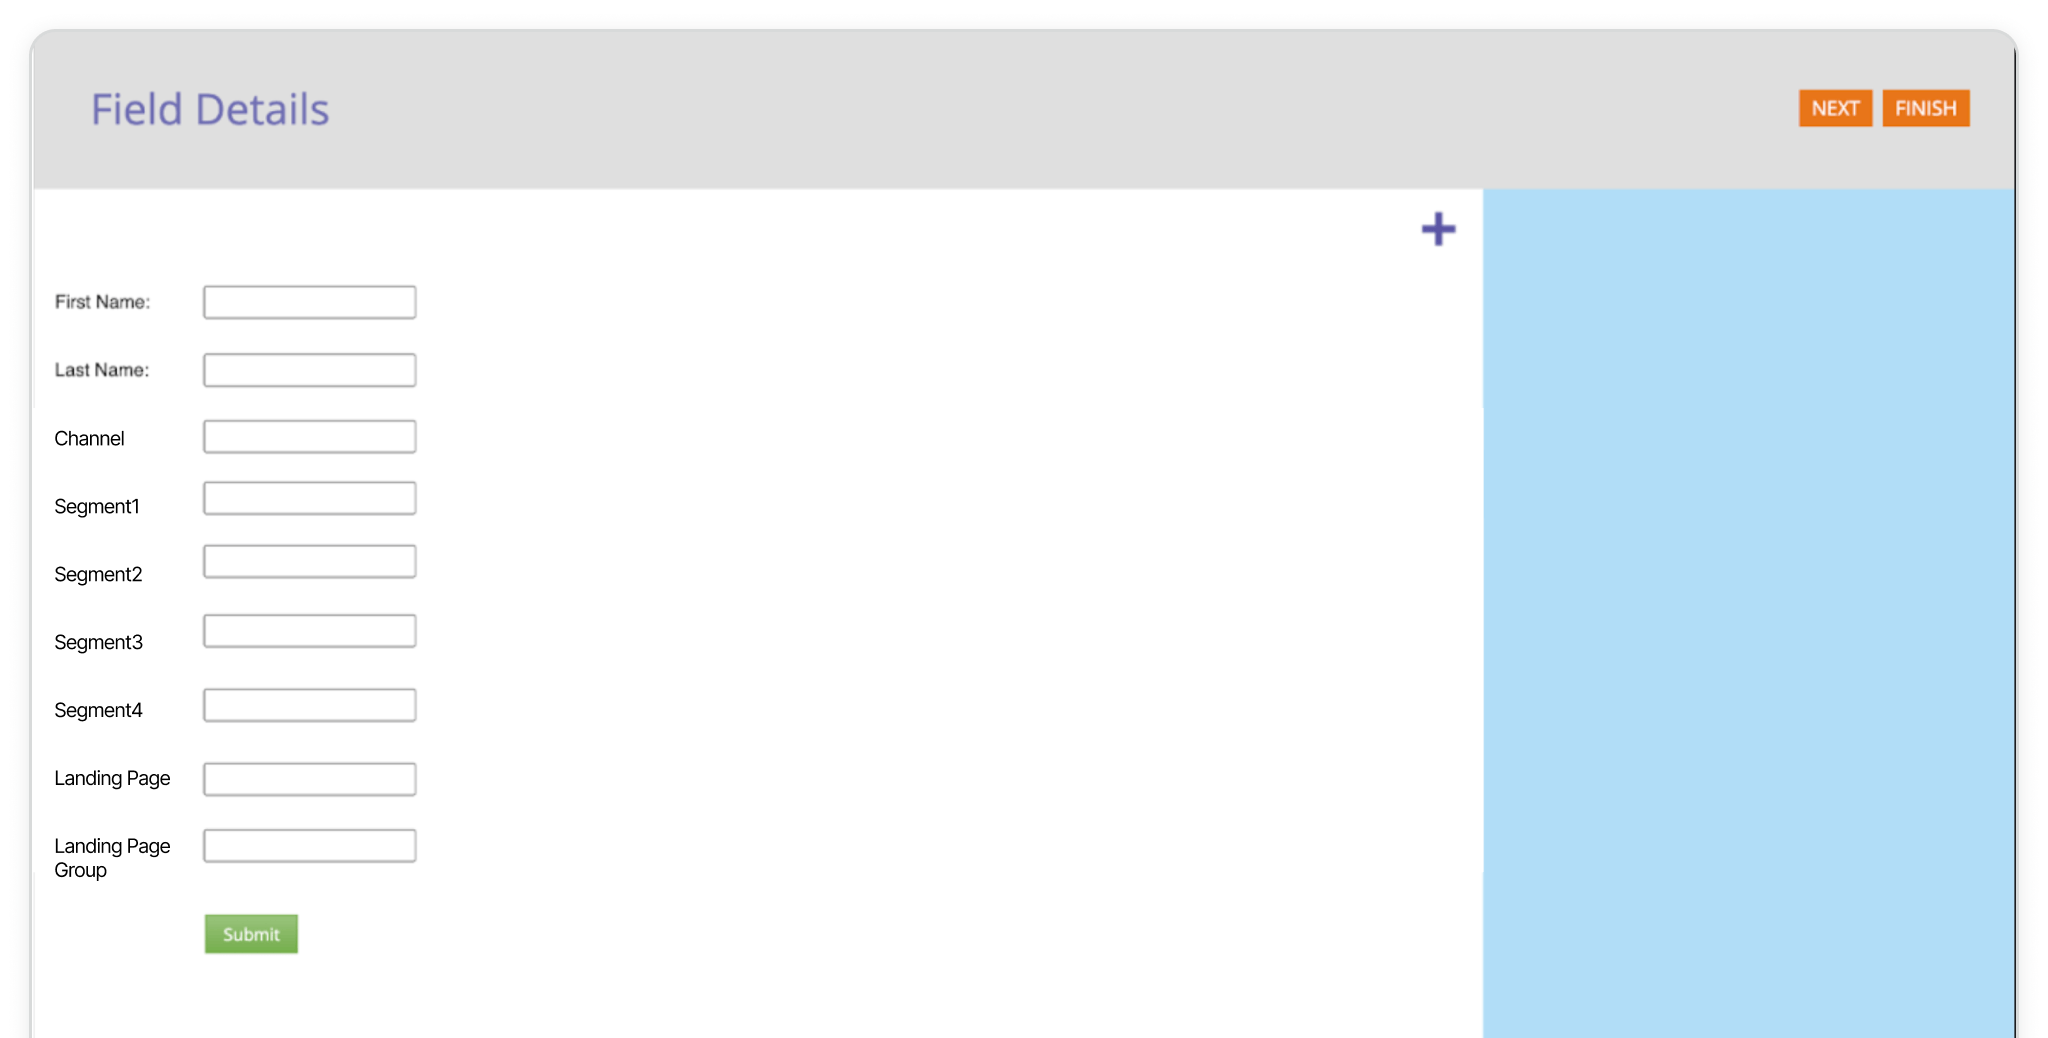

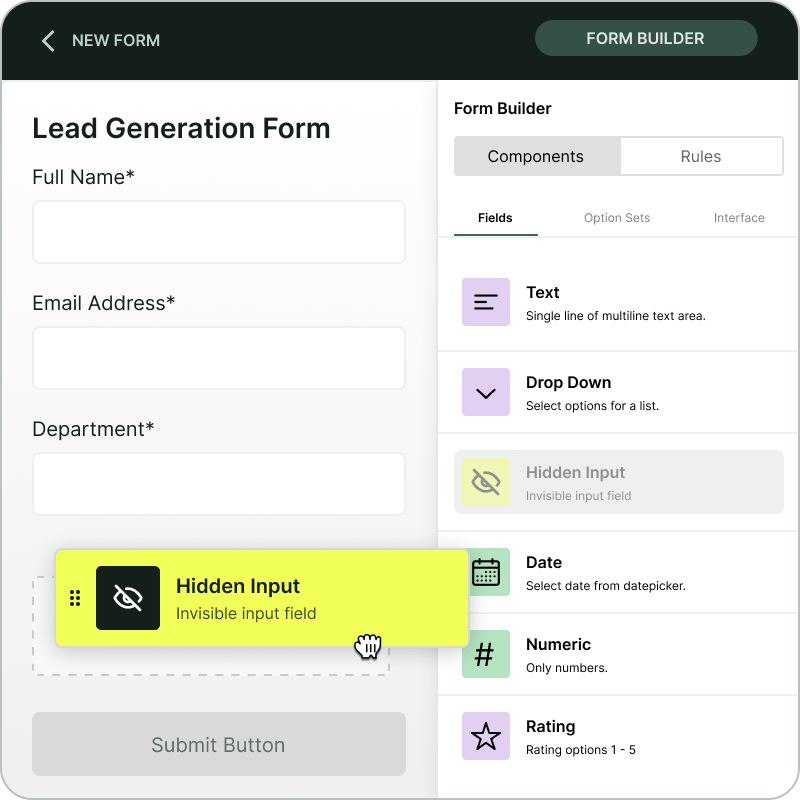

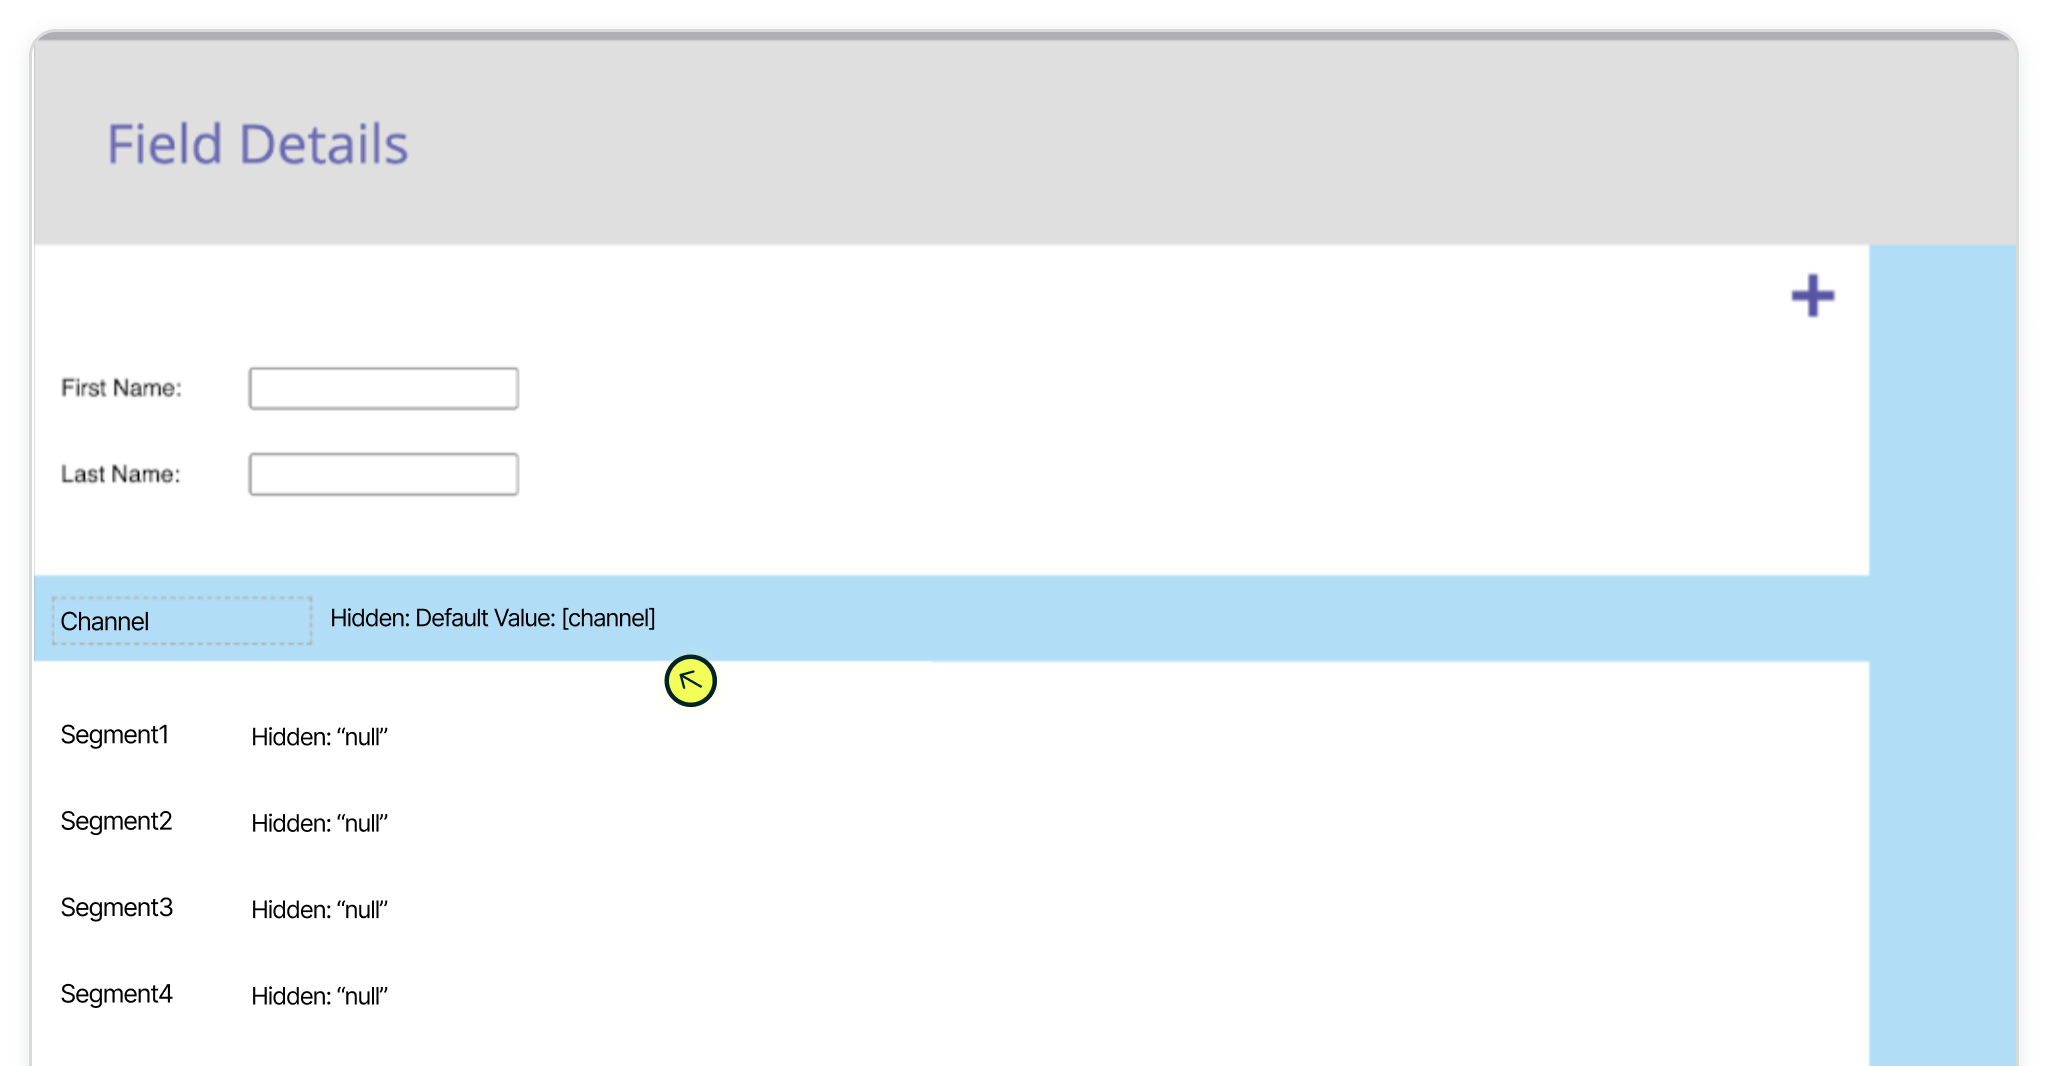
Now that your fields are added to the form, you need to configure them so they capture attribution data without being visible to visitors.
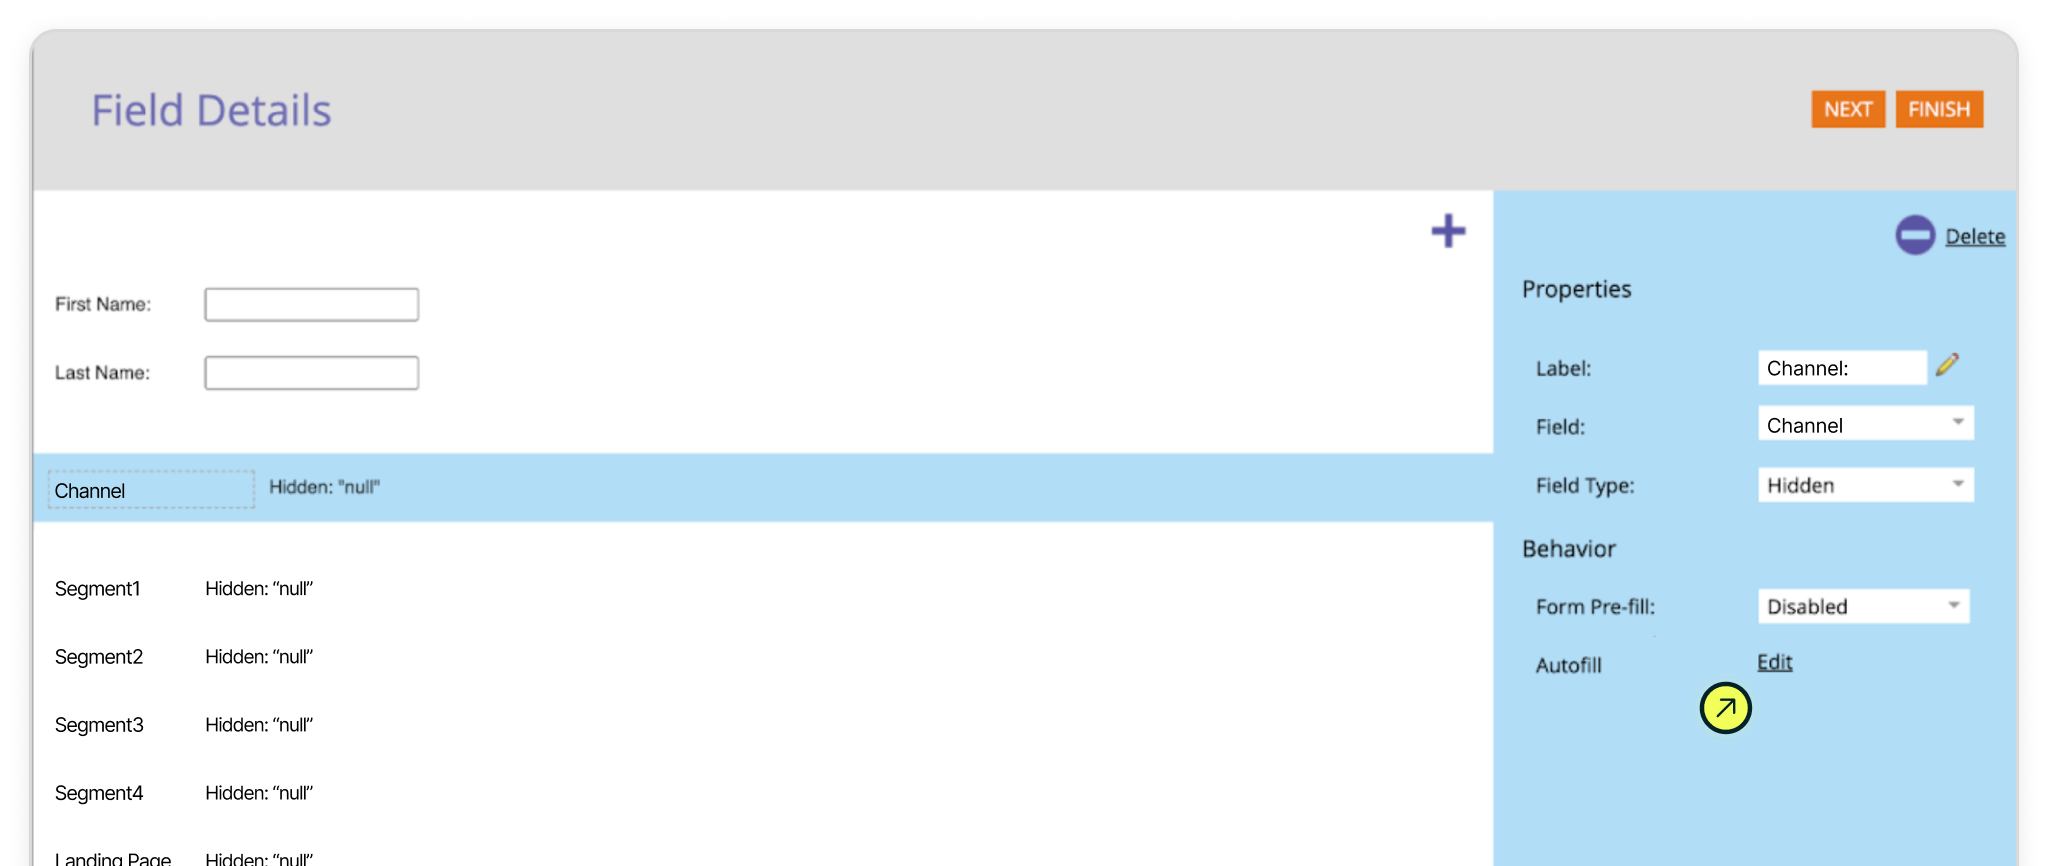
In the Form Editor, click on one of the fields you added, such as Channel. In the right-hand panel, update the Field Type to Hidden.
Repeat this for each of the Madlitics fields, including Segment(s) 1-4, Landing Page, and Landing Page Group.
Hidden fields are not shown to the person filling out the form, but they still capture and store data when the form is submitted.

Hidden
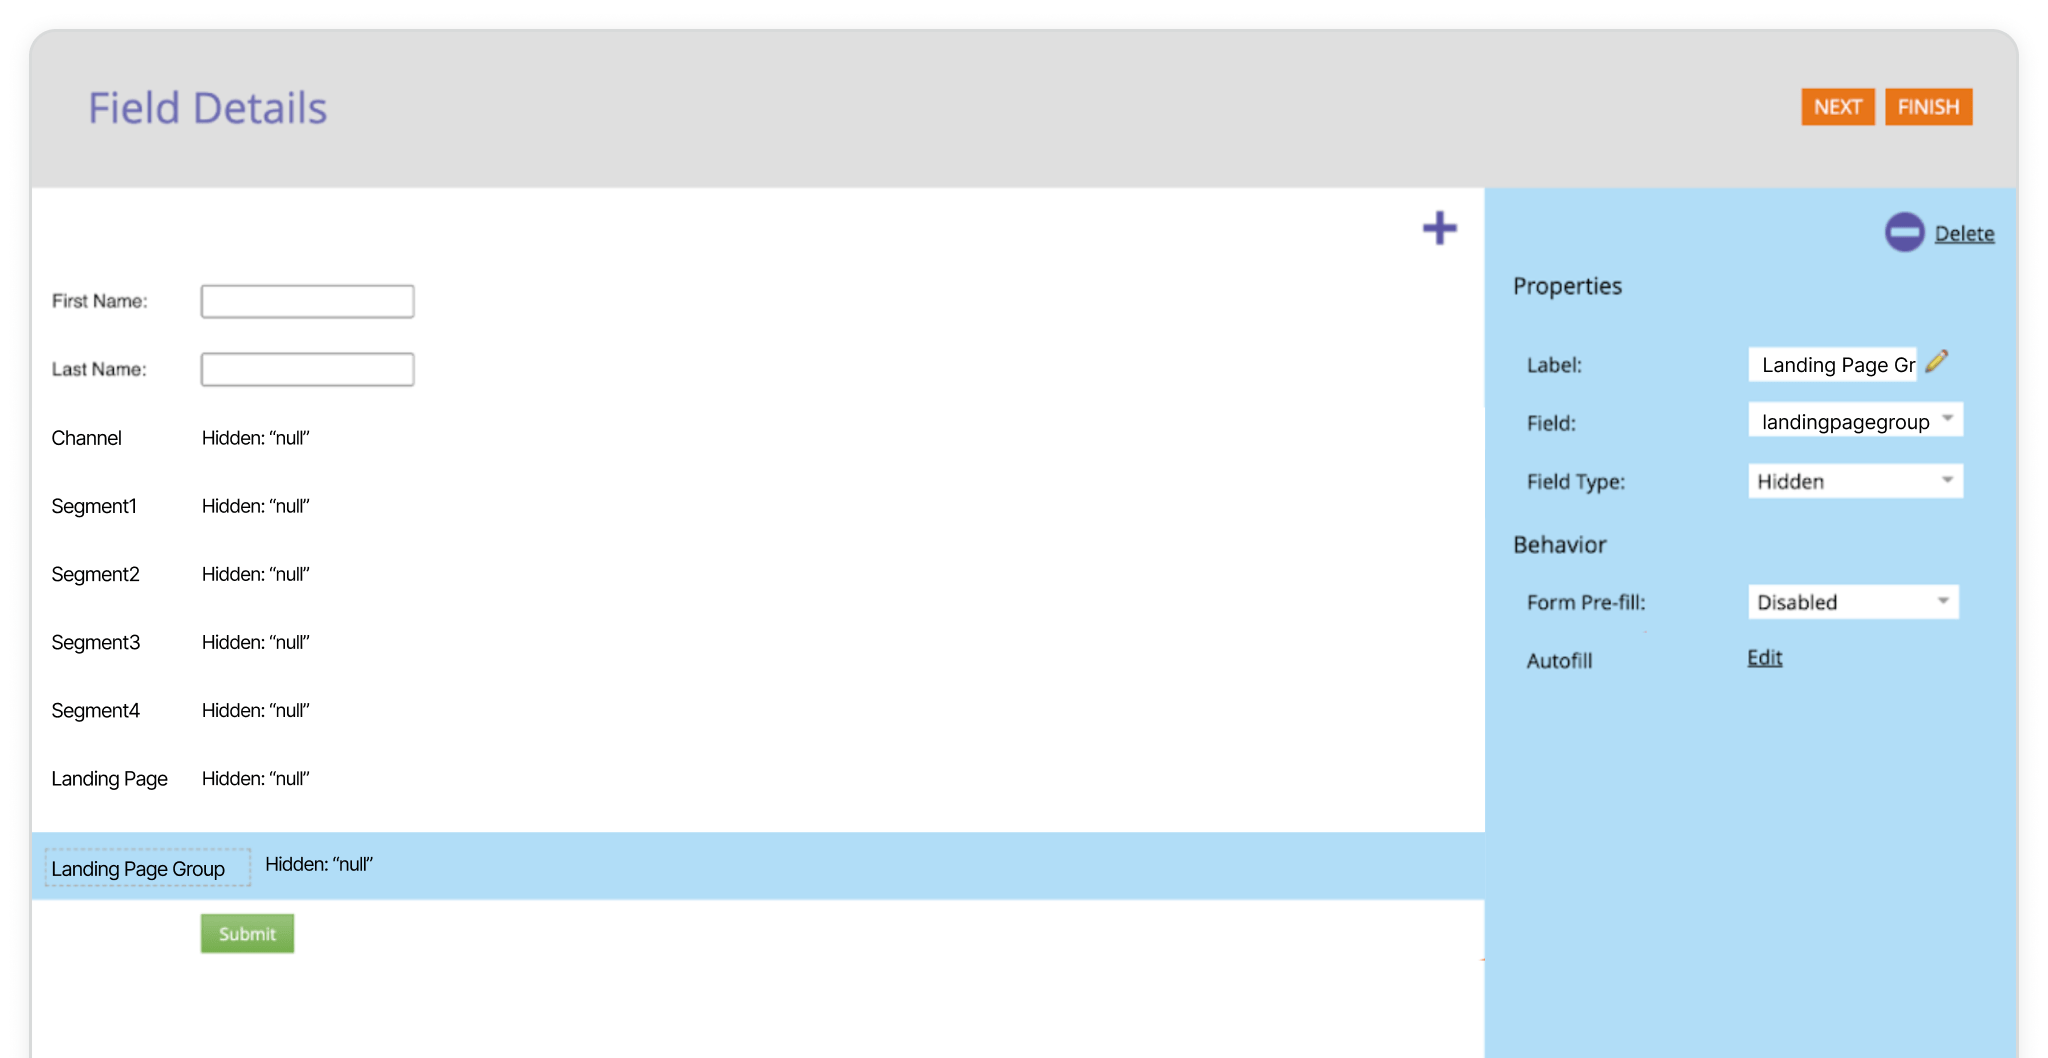
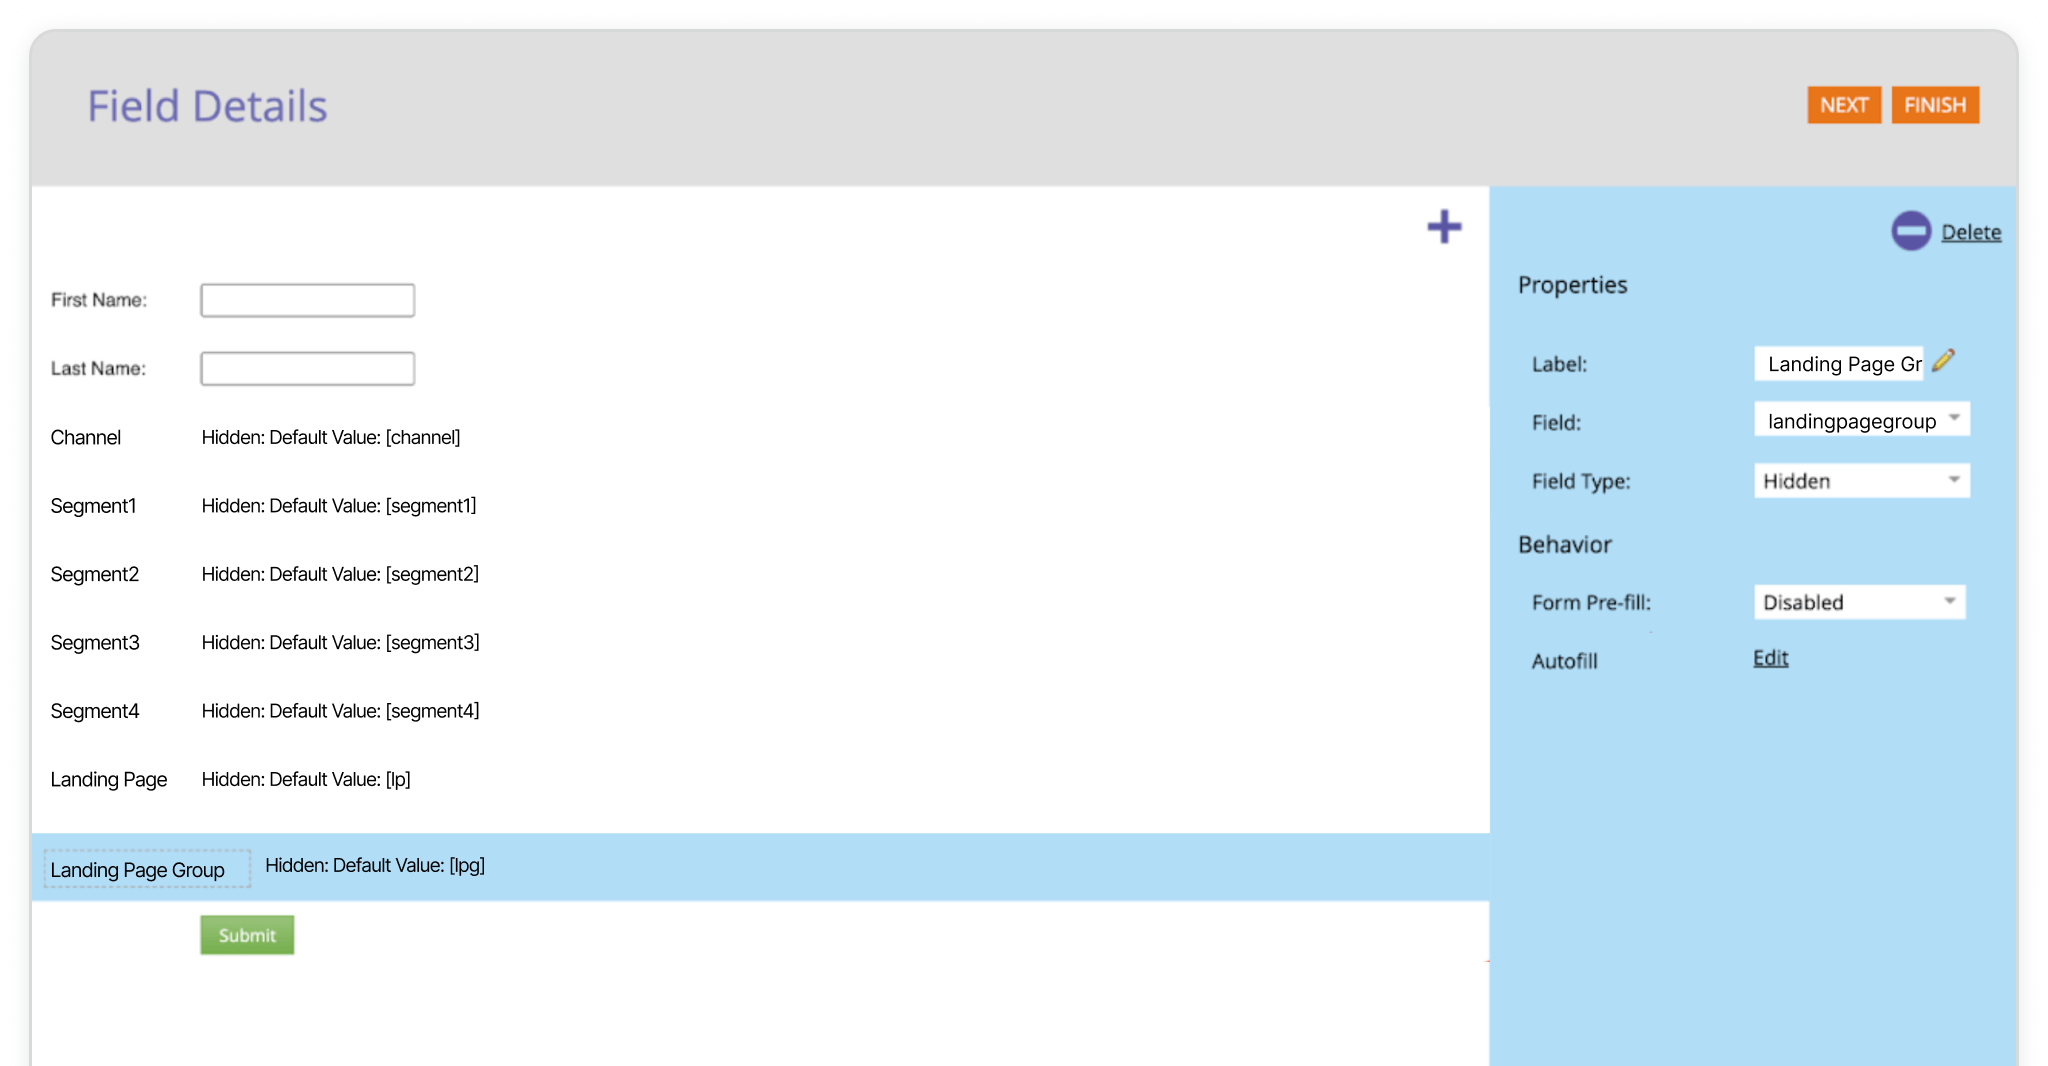
Now you’ll set up each Madlitics field so it can automatically receive attribution data when the form is submitted. In the Marketo Form Editor, select one of your fields, such as Channel, to open the Properties panel.
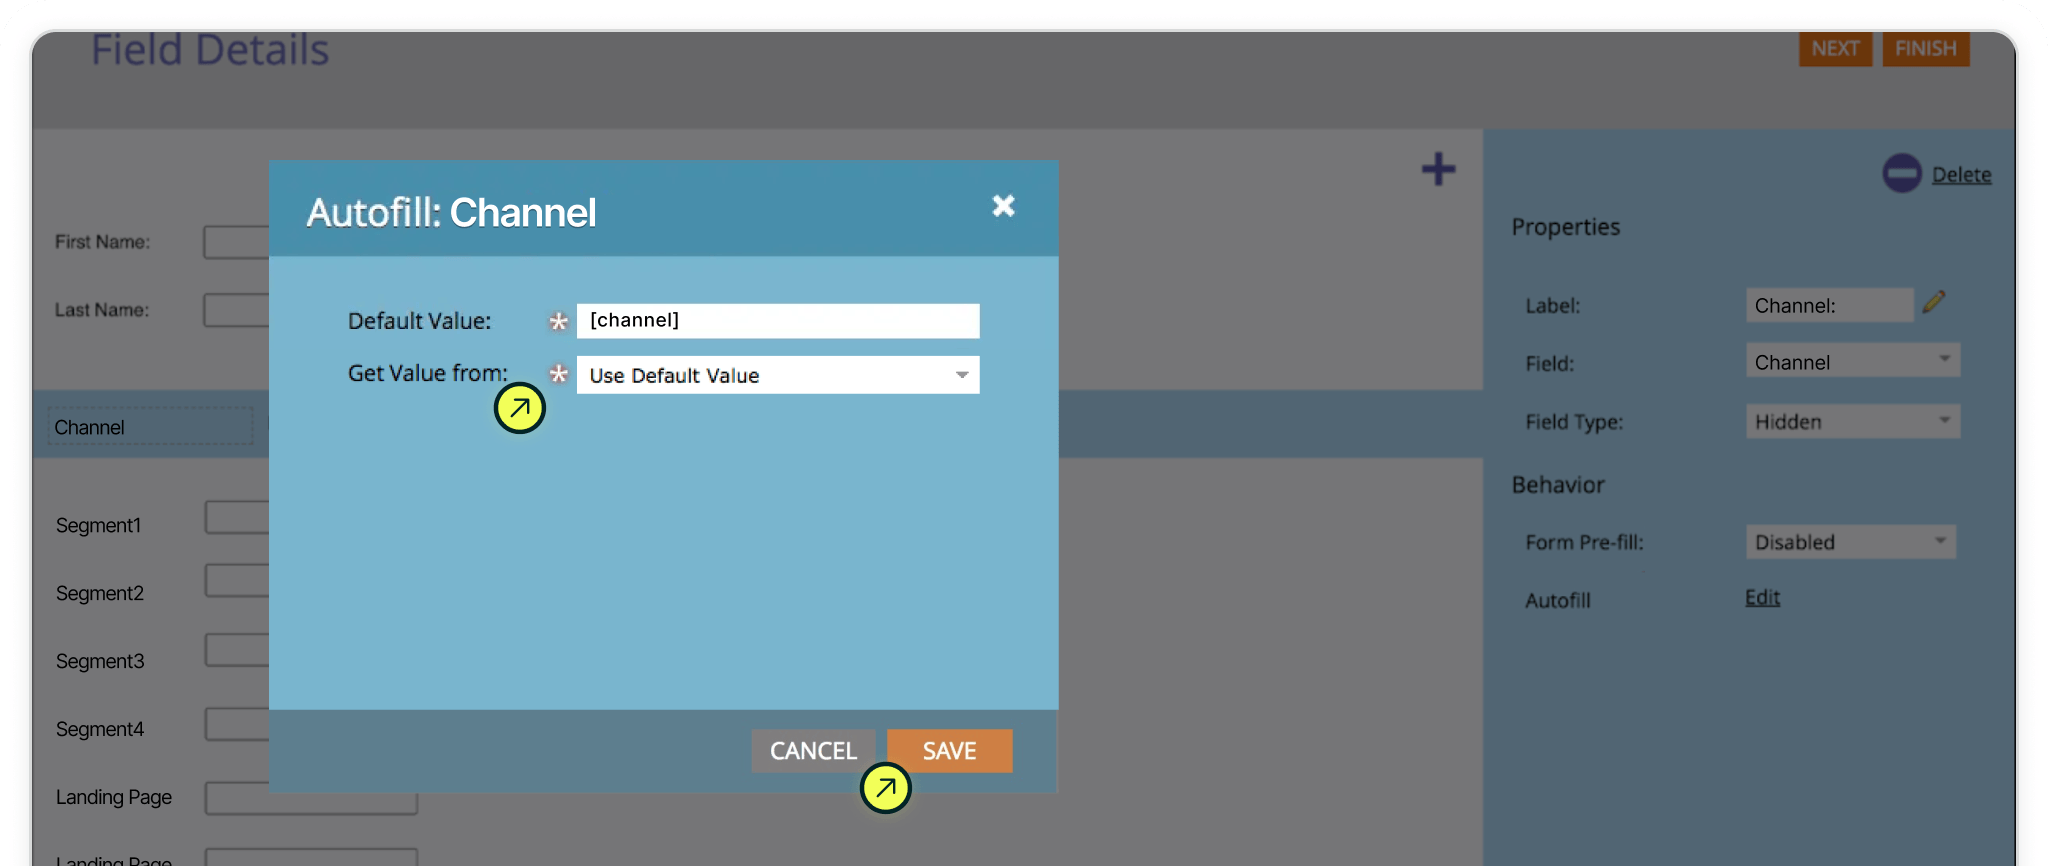
Next to Autofill, click 'Edit' to open the Autofill settings. In the modal, set Get Value From to 'Use Default Value', then enter the matching Madlitics token in the Default Value field: [channel]
Click Save to apply the change.
Repeat this process for each Madlitics field, using the corresponding default values:
[channel][segment1][segment2][segment3][segment4][lp][lpg]
[channel])
For additional fields and values including clickIDs (gclid/fbclid) or extra parameters, see Madlitics field values pairs.
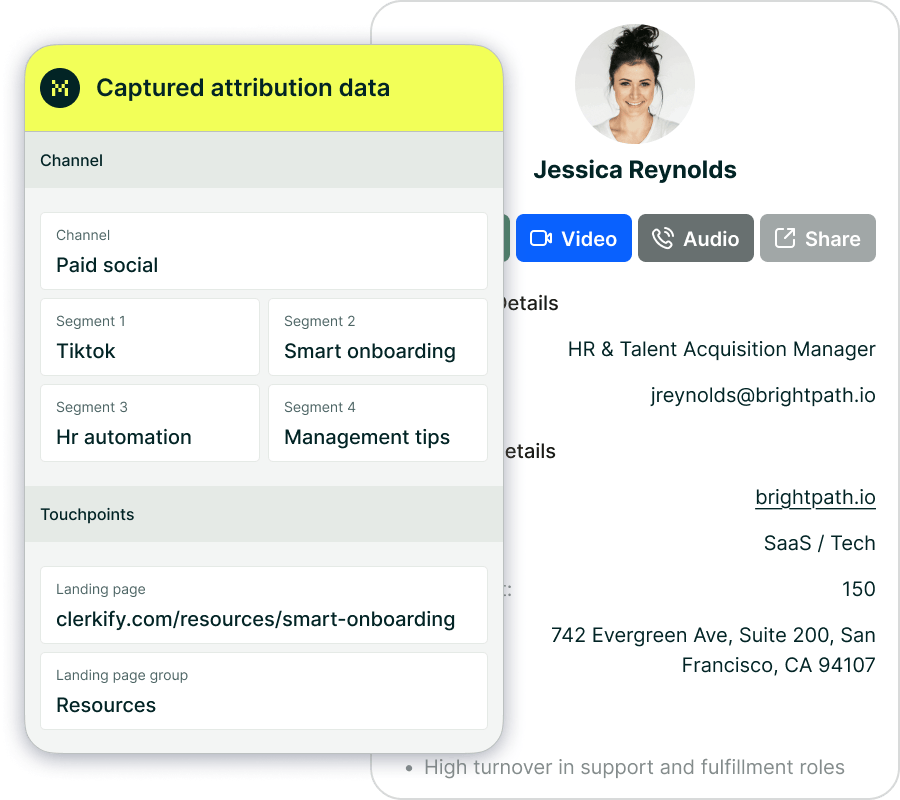
Marketing Channel Category (Field 1)
Categorizes the visit’s marketing channel based on multiple signals, including traffic type, referring domain, and known platforms.
Object: Lead
Type: String
Name: Channel
API Name: channel
Field Type: Hidden
Get Value From: Use Default Value
Default value: [channel]
Segment 1 (Field 2)
Captures the source of the traffic, identifying the specific platform, publisher, or partner that sent the visitor to your site; for paid traffic, this field records the utm_source, for organic traffic the platform, for referrals the referring domain, and for direct traffic no value is captured.
Object: Lead
Type: String
Name: Segment 1
API Name: segment1
Field Type: Hidden
Get Value From: Use Default Value
Default value: [segment1]
Segment 2 (Field 3)
Captures the campaign-level details associated with the visit, identifying which campaign, promotion, or initiative led the visitor to your site; for paid traffic, this field records the utm_campaign, for organic traffic the referring domain, and for direct traffic no value is captured.
Object: Lead
Type: String
Name: Segment 2
API Name: segment2
Field Type: Hidden
Get Value From: Use Default Value
Default value: [segment2]
Segment 3 (Field 4)
Captures the keyword, creative variation, or content-level detail that influenced the visit, such as a paid search term, specific ad, post type, or format; for paid traffic, this field records the utm_term, for organic traffic the full referring URL when available, and for direct traffic no value is captured.
Object: Lead
Type: String
Name: Segment 3
API Name: segment3
Field Type: Hidden
Get Value From: Use Default Value
Default value: [segment3]
Segment 4 (Field 5)
Captures the audience, ad group, or offer associated with the visit, showing how the traffic was segmented within a campaign; for paid traffic, this field records the utm_content, and for organic and direct traffic no value is captured.
Object: Lead
Type: String
Name: Segment 4
API Name: segment4
Field Type: Hidden
Get Value From: Use Default Value
Default value: [segment4]
Landing Page (Field 6)
Captures the exact page where the visitor first entered your site, recording the original entry point of the session.
Object: Lead
Type: String
Name: Landing Page
API Name: landingpage
Field Type: Hidden
Get Value From: Use Default Value
Default value: [lp]
Landing Page Group (Field 7)
Captures the category or logical grouping of the landing page, allowing multiple related entry points to be analyzed under a shared identifier.
Object: Lead
Type: String
Name: Landing Page Group
API Name: landingpagegroup
Field Type: Hidden
Get Value From: Use Default Value
Default value: [lpg]
With your form configured and approved, the final step is embedding it on your website so visitors can submit it and attribution data starts flowing into Marketo.
For new forms
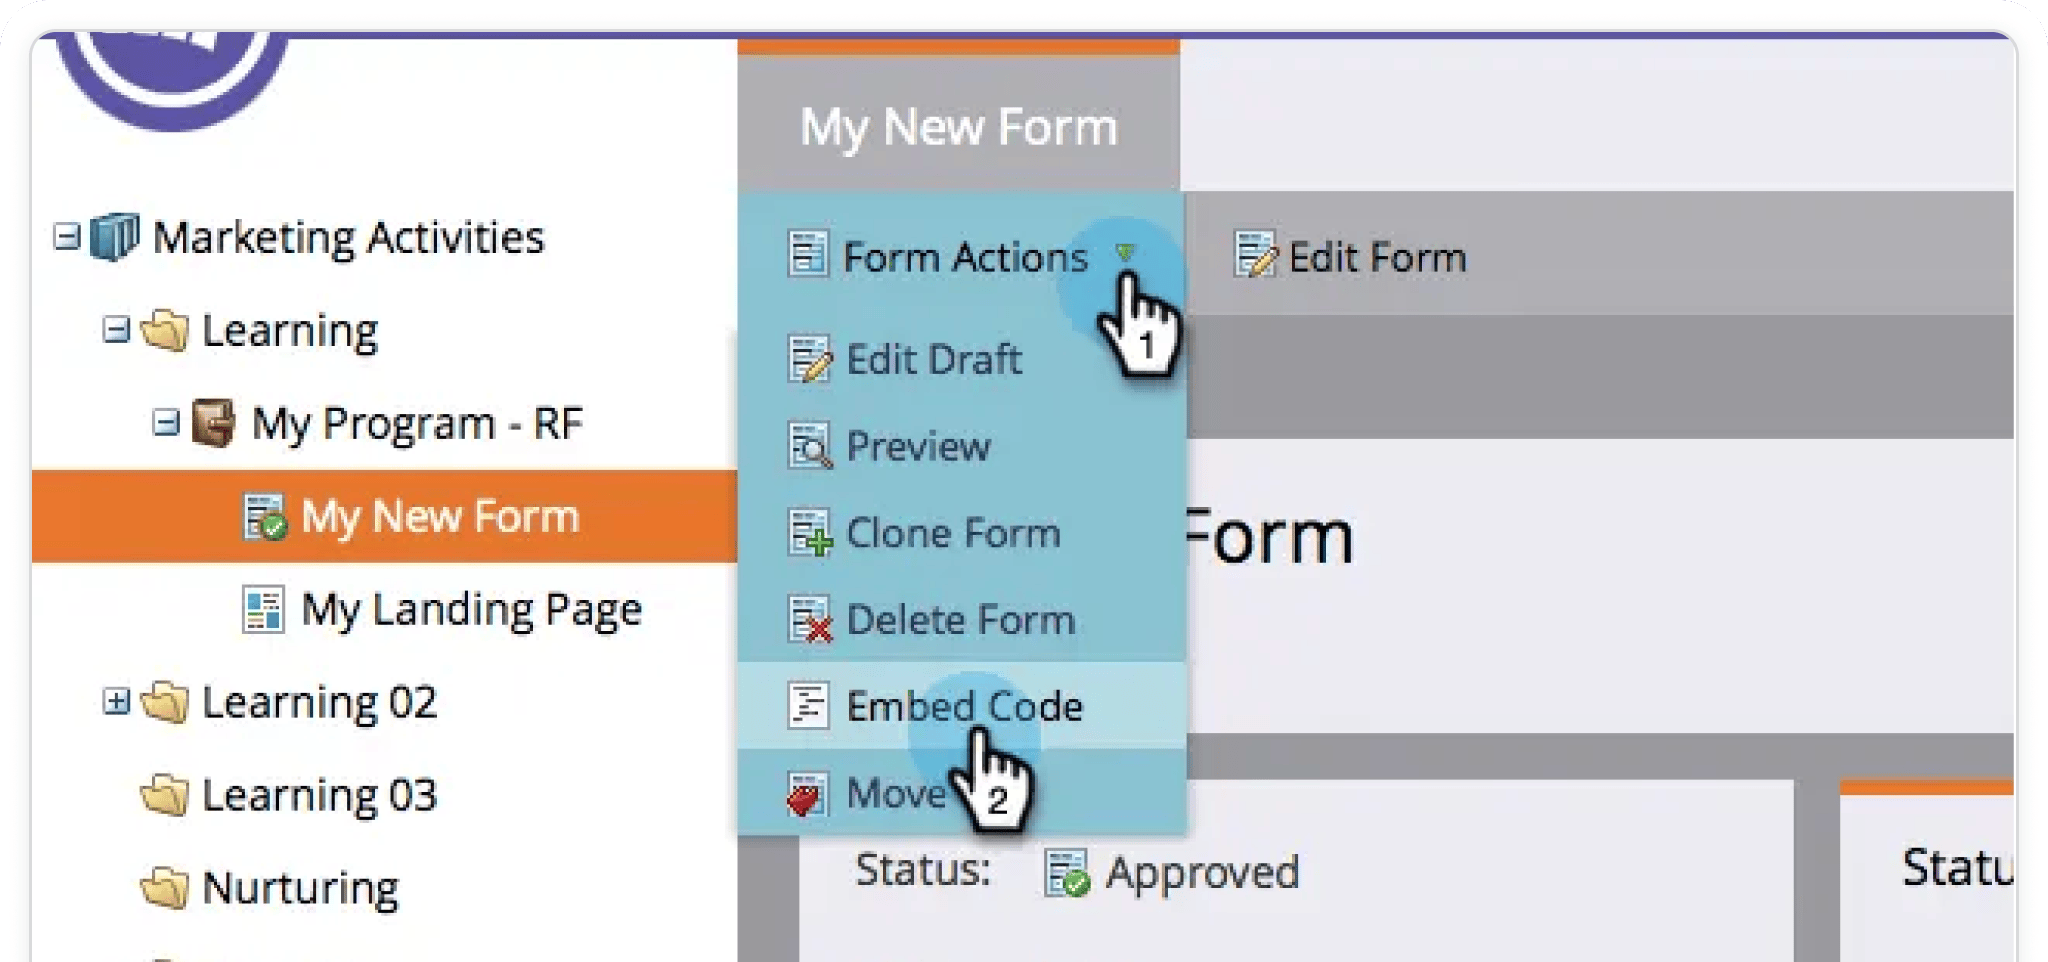
In Marketing Activities, select your form, then click Form Actions → Embed Code.
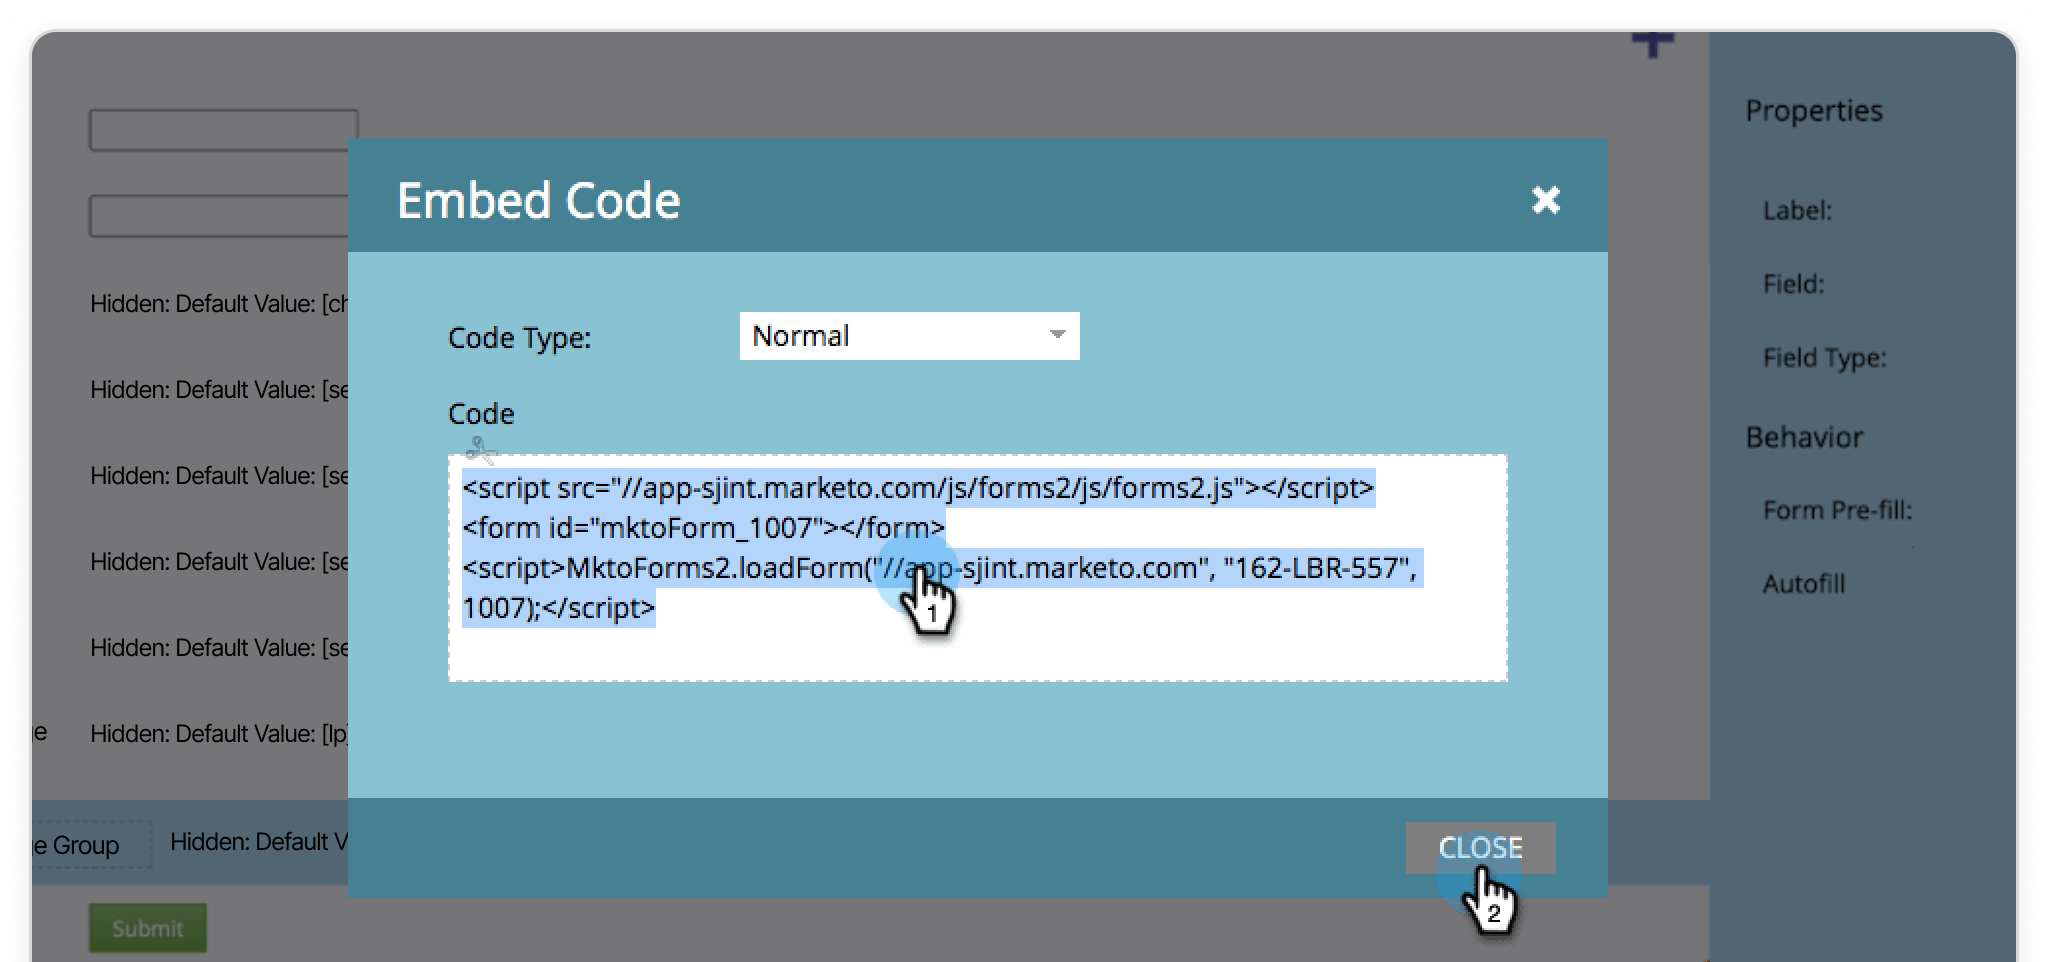
Copy the provided embed code, then paste it into your website where you want the form to appear. You can add this directly into your CMS, page builder, or site template. Marketo forms load dynamically using the embed script, so they can be embedded on any external page.
After adding the embed code to your site, publish your page. Your form will be live and ready to capture submissions, with Madlitics attribution values flowing into the lead record.
For existing forms
If you updated an existing form, click Finish, then Approve and Close in Marketo. Your changes will automatically apply to any embedded instances of the form, so no updates to the embed code are required.
Test your setup
To confirm everything is working correctly, visit your live page with UTM parameters in the URL. For example:
?utm_source=google&utm_medium=cpc&utm_campaign=marketo-test
Submit the form as a visitor would. In Marketo, you should see attribution values like channel, segment fields, and landing page data stored alongside the lead record. This test reinforces that your Marketo‑based attribution setup is capturing UTM‑style data and will show you exactly which campaigns and channels are driving leads.


With everything set up, your Marketo forms are now ready to capture attribution data right alongside each lead submission. Instead of losing context when someone clicks around your site, that data is passed directly into your Lead records at the moment of conversion, giving you a clear view of how each lead found you.
This is where things start to click. With attribution stored on the lead itself, you can build smarter Smart Lists, improve campaign reporting, and give your team real context on every new inquiry. Hidden fields make this possible by capturing data behind the scenes without affecting the form experience .
From here, every form submission becomes more than just a contact. You’re capturing the channel, campaign, and landing page that drove it, so you can focus on what’s actually working and make better decisions moving forward.
Answers to common questions about setting up tracking with Madlitics and Marketo