Support

Installing Madlitics on WordPress

How to add the Madlitics code snippet to your WordPress site

WordPress powers a massive part of the internet — from blogs and small businesses to enterprise websites. If you’re using it, you’re in good company. Adding code to your WordPress site’s <head> is one of those common tasks almost every marketer runs into. It might sound technical, but it’s actually pretty straightforward — especially when you’ve got the right guide.

The only thing to watch for? Not all WordPress sites work the same. Some are built on WordPress.com, the managed, hosted version, while others run on WordPress.org, the open-source version that lets you customize every detail. Whichever one you’re using, Madlitics makes it simple. In this guide, we’ll show you multiple ways to install the Madlitics code snippet — no stress, no headaches — so you can start capturing accurate attribution data without breaking a sweat.

Before jumping into the install steps, it’s important to know which version of WordPress your site is built on — because it determines which installation methods are available.

• WordPress.com is the hosted version. It’s simple, secure, and handles the technical stuff for you — but limits direct access to the site’s code. To add code to your header, you’ll need to use a plugin, and only if you’re on a Business plan or higher.
• WordPress.org
is the open-source, self-hosted version. It gives you full control over your site’s code, themes, and plugins. If you’re using WordPress.org, you have several options for adding the Madlitics snippet — including adding it directly to your theme’s code if you’d like.

Not sure which one you’re using?
If you log in at wordpress.com, you’re likely using the hosted version. If you’re managing your site through your own hosting provider, you’re working with WordPress.org.

Before you can add Madlitics to WordPress (or any site), you’ll need to create a Madlitics account and grab your installation snippet. Once you have your snippet, you’re ready to install it into WordPress.

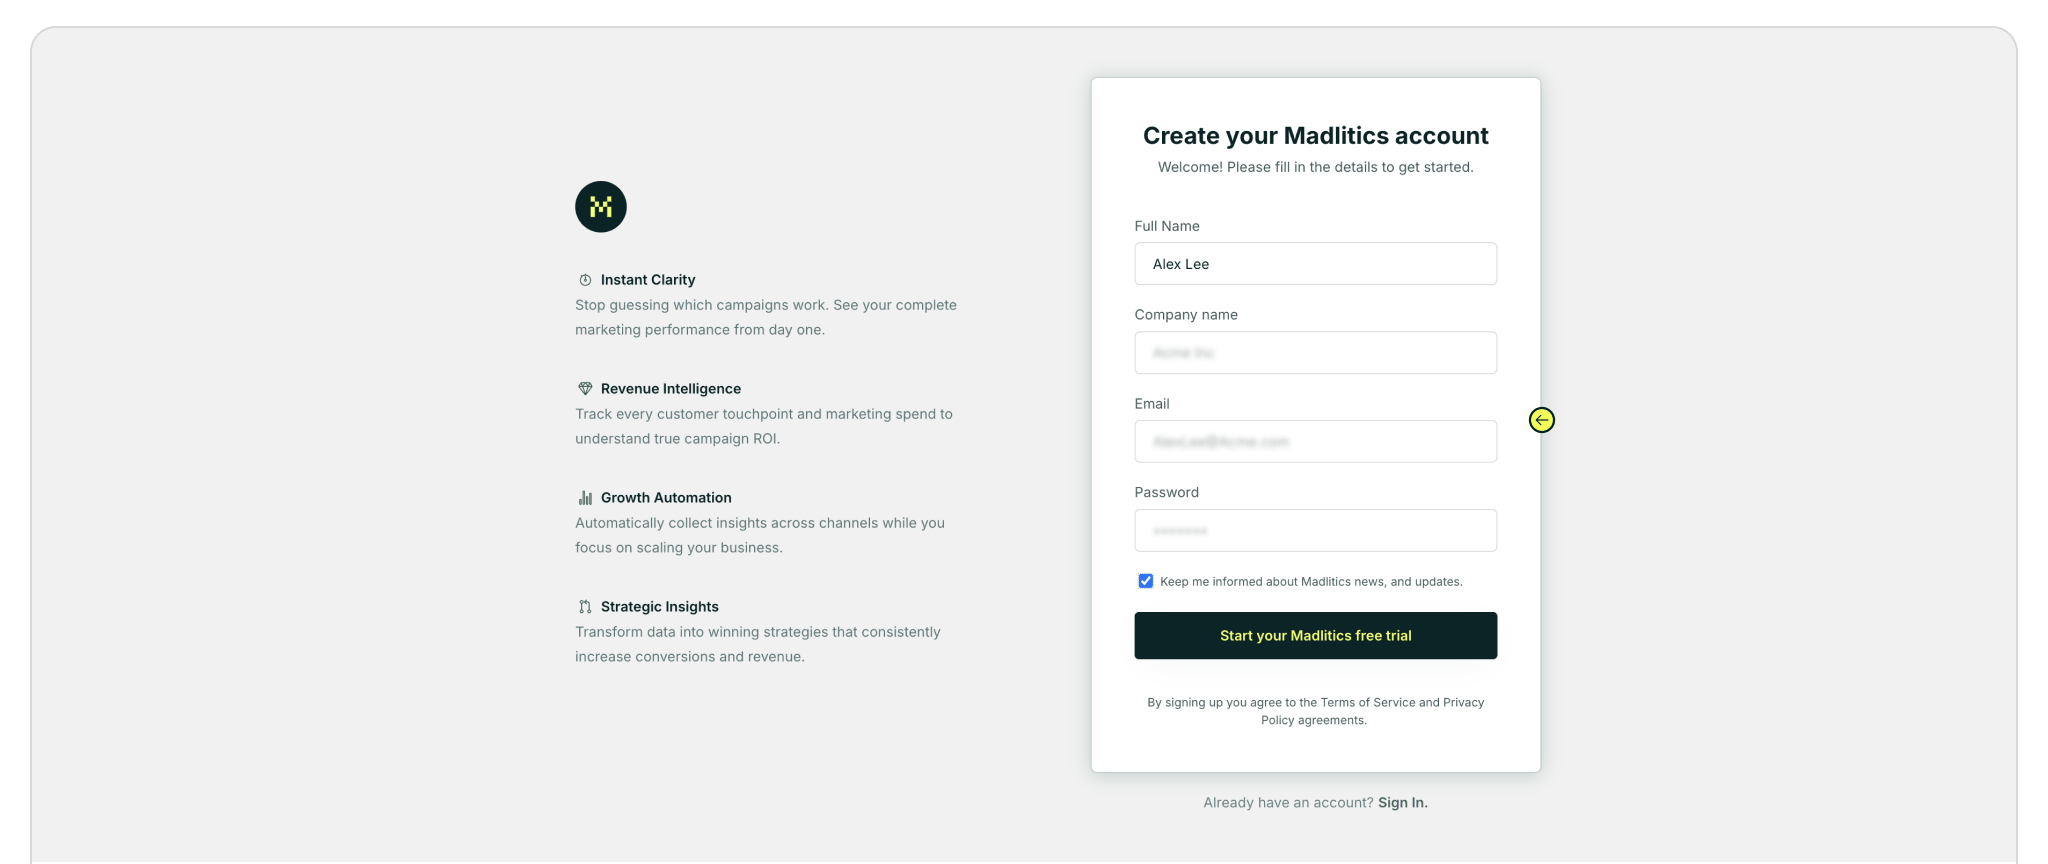
Step 1. Create your Madlitics account
Sign up for a free trial on the Madlitics website to get started. Creating an account unlocks your dashboard, where you’ll manage your sites, view analytics, and access the code snippet you’ll need to install.


Start by signing up for a free Madlitics trial to begin capturing attribution data.


Fill out the registration form to create your account and unlock your dashboard

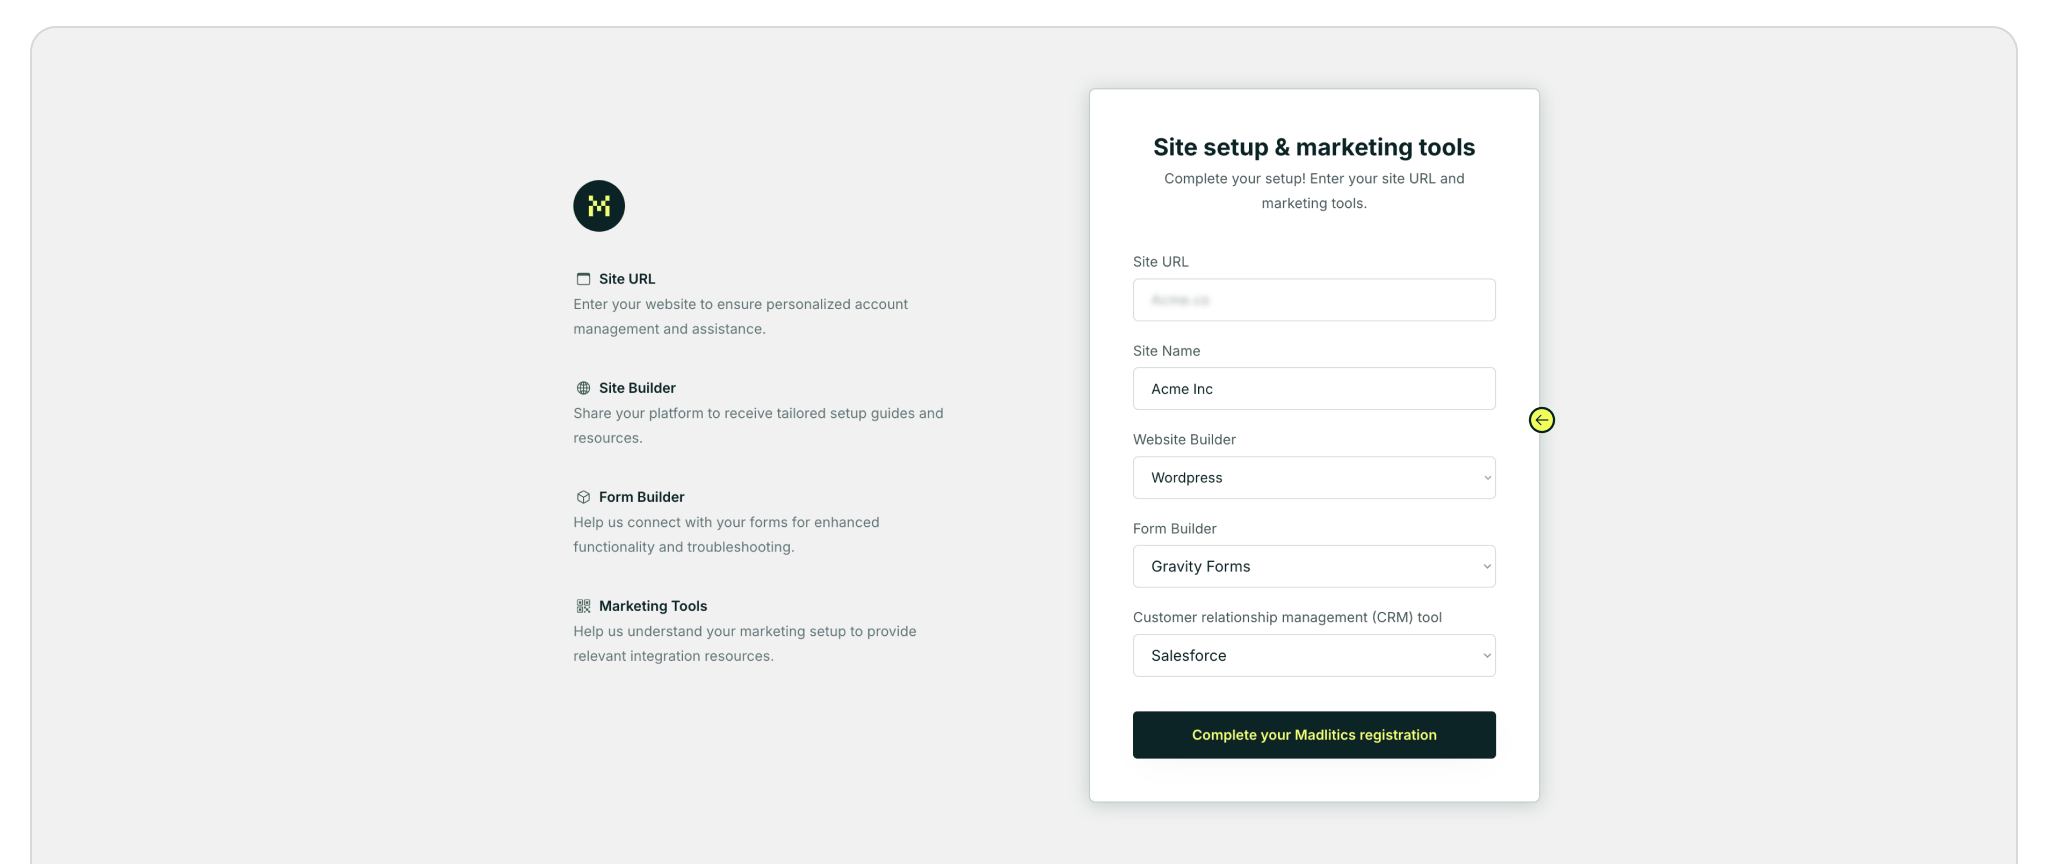
Step 2: Access your installation snippet
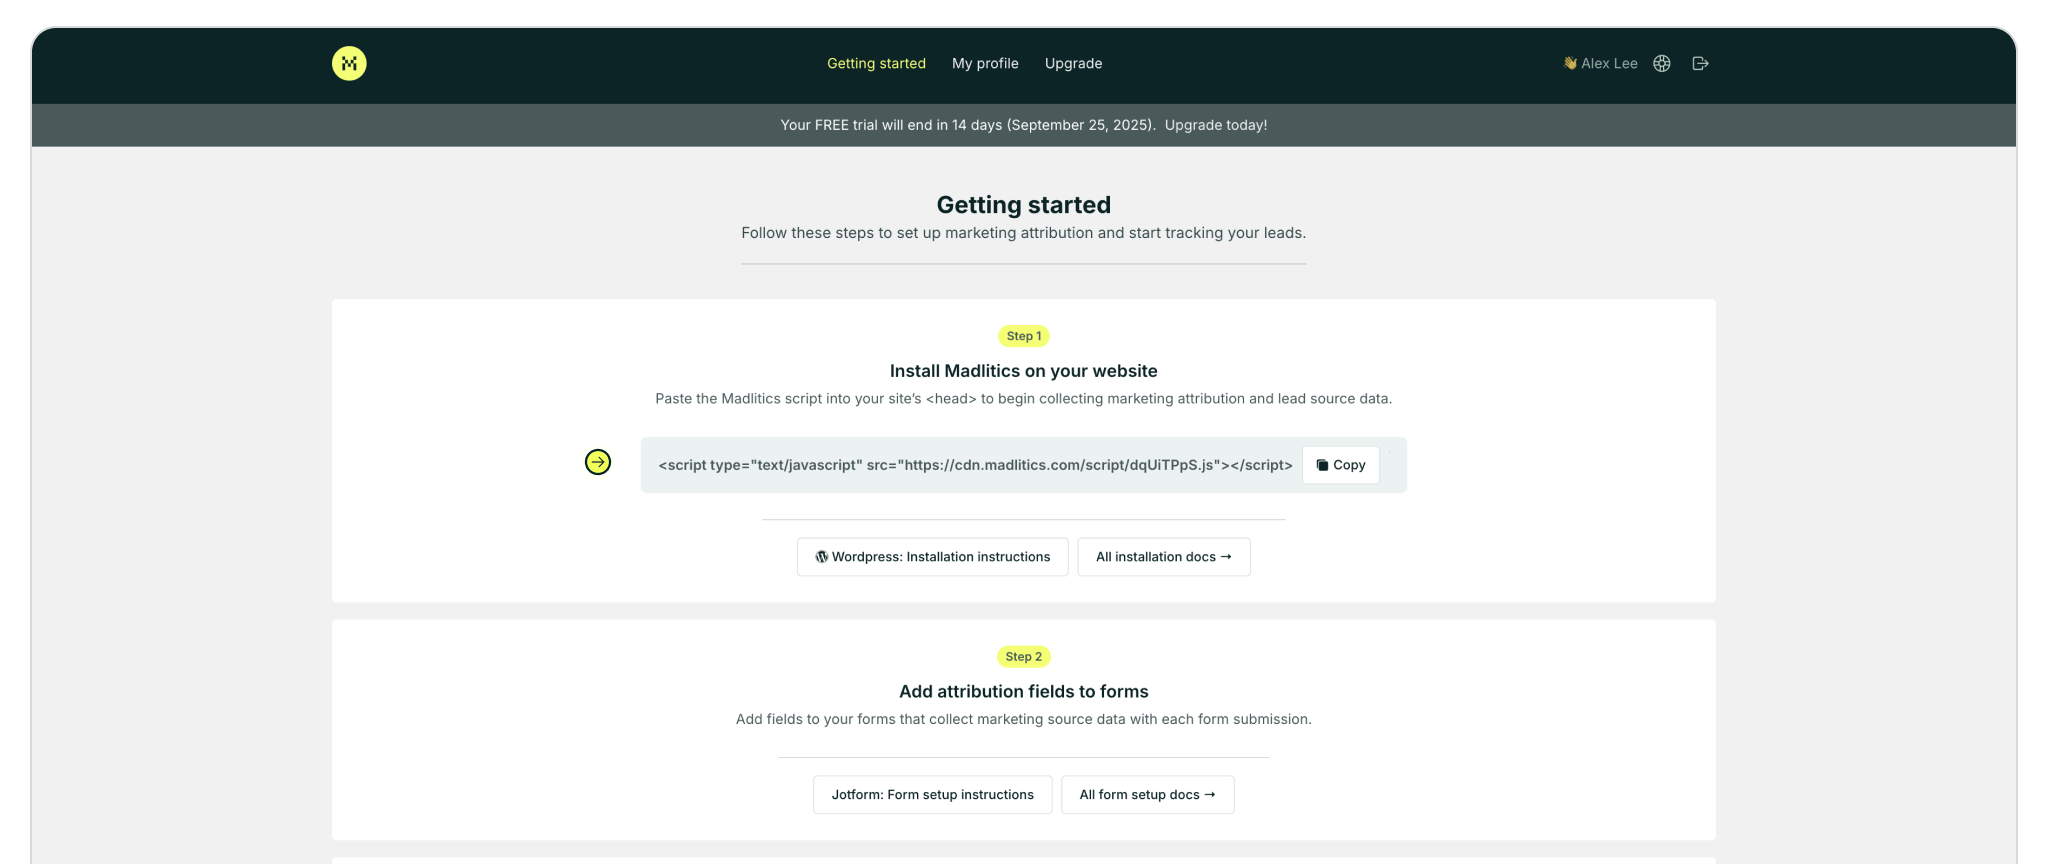
Once you’ve registered and logged in, you’ll land in your dashboard’s Get Started section. Here, you’ll find your unique Madlitics installation snippet, which is required to enable tracking on your site.


Locate your unique installation snippet in the dashboard under Get Started › Step 1 › Copy Code Snippet.

WordPress offers more than one way to add code to your site’s <head>, and the best method depends on whether you’re using WordPress.com or WordPress.org. For most users, installing a plugin like WPCode is the simplest and most reliable option — it ensures your snippet loads across every page without editing theme files. If you prefer, advanced users on WordPress.org can add the snippet directly to their theme code. In the steps below, we’ll walk through both approaches.

Option A: Use a plugin (WPCode)

Recommended — All versions of wordpress.
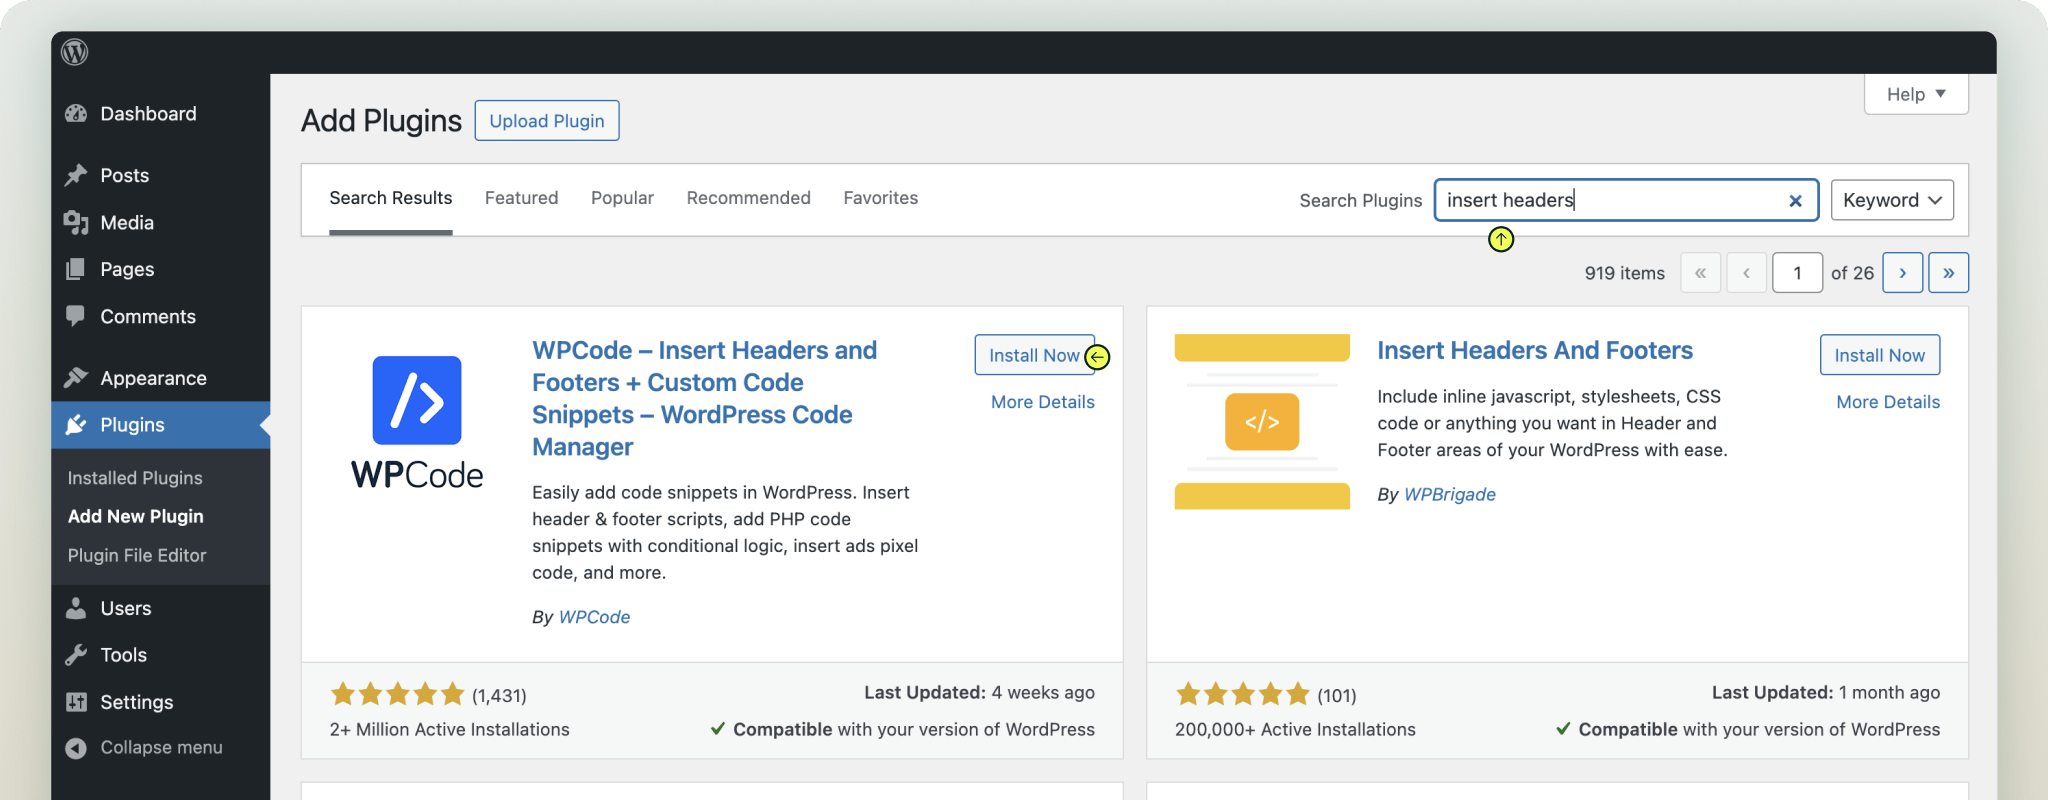
If your theme doesn’t offer a built-in way to add header code — or you just want the easiest, most reliable option — we recommend using the free Insert Headers and Footers by WPCode plugin. If you’re on WordPress.com, this will likely be your only option since direct access to the theme’s code is restricted.

  1. Log in to your WordPress dashboard.
  2. If you’re on WordPress.com, make sure you’re on a Business plan or higher (plugins require it).
  3. In the left-hand menu, go to PluginsAdd New Plugin.
  4. Search for "Insert Headers and Footers by WPCode."
  5. Click Install, then Activate.
  6. After activation, go to Code SnippetsHeader & Footer.
  7. Paste your Madlitics snippet () into the Header code box
  8. Click Save Changes.

Once saved, you’re good to go — the Madlitics code will load automatically across every page of your site. No theme edits, no coding experience needed, and your snippet will remain intact even if you switch themes or update WordPress.


Option A: Install the 'Insert Headers and Footers' by WPCode plugin from the WordPress dashboard.

Option B. Theme’s built-in header code

For self-hosted wordpress sites — wordpress.org
Many premium themes — like Divi, Genesis, or Astra — offer a simple way to insert custom code into your site’s header, no plugin needed. If your theme has this feature, it’s often the fastest way to get Madlitics up and running.

  1. Log into your WordPress dashboard.
  2. Open your theme’s settings (this varies by theme, e.g., DiviTheme Options).
  3. Look for a section like Integration, Header & Footer Scripts, or something similar.
  4. Paste your Madlitics snippet () into the Header code box
    example: <script type="text/javascript" src="https://cdn.madlitics.com/script/"></script>
  5. Save your changes.

Tip: If you ever switch to a different theme, you’ll need to repeat this step since custom code added via theme settings doesn’t carry over automatically.

No extra tools, no complex setup — just a quick and easy way to place the Madlitics snippet where it belongs.


B. Add code into the header of a current theme, from the theme options, if available.

Option C: Manually editing header.php

For self-hosted wordpress sites — wordpress.org
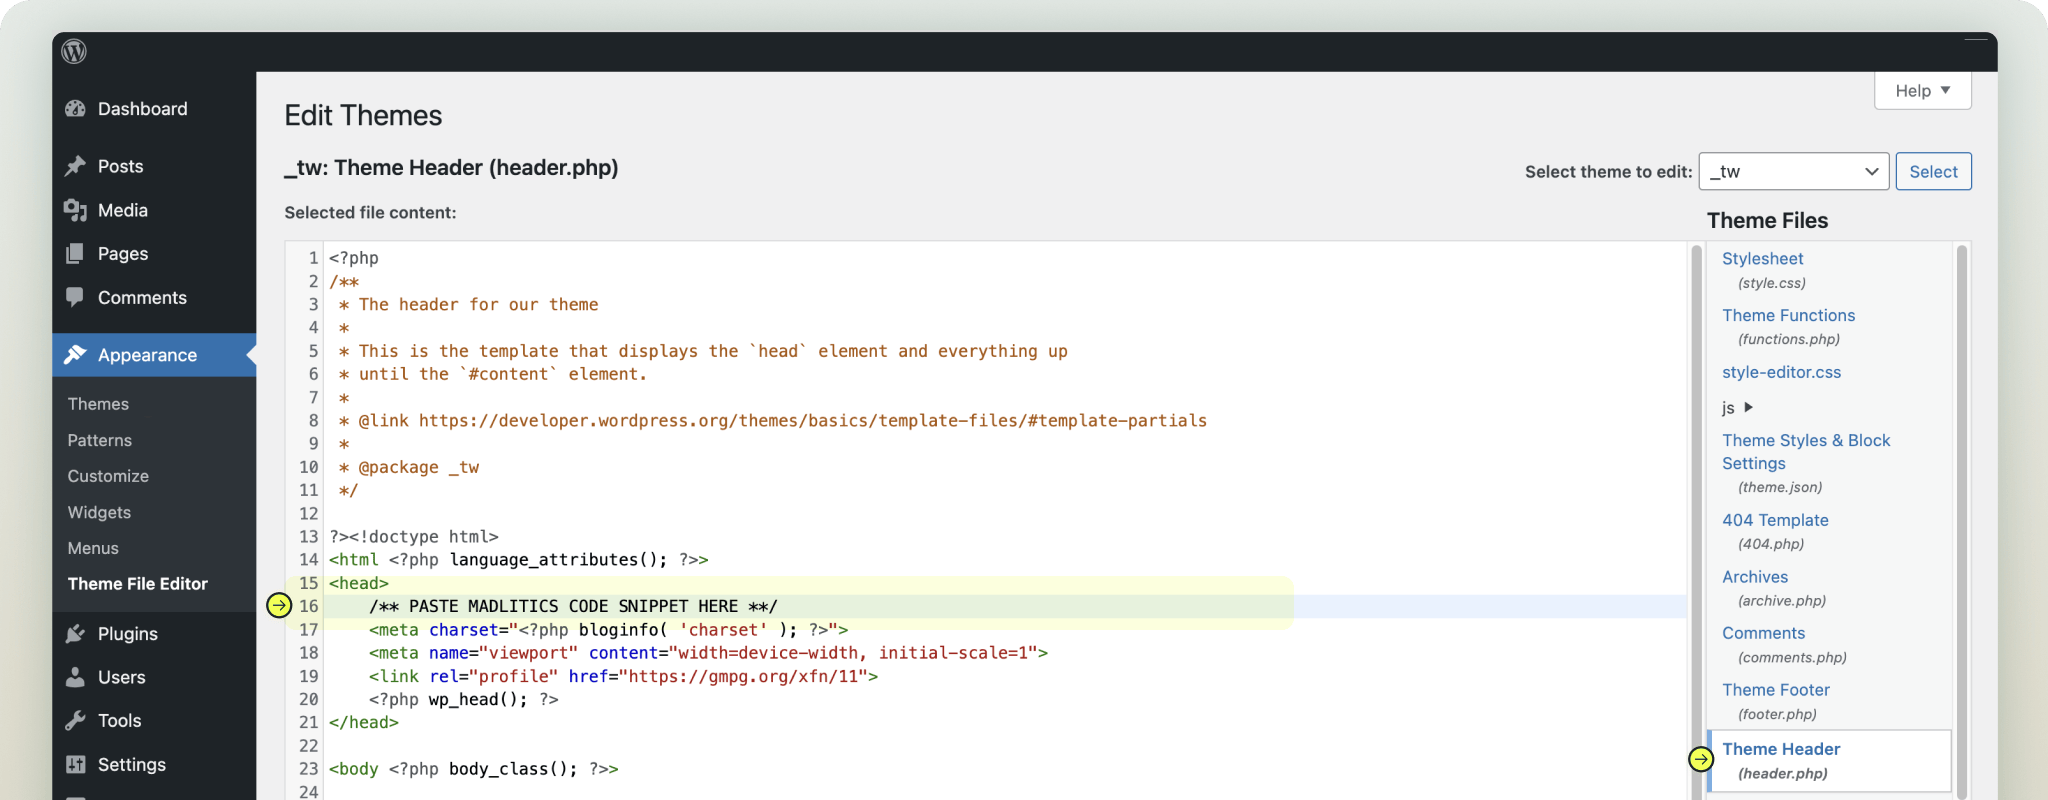
If you’re comfortable editing theme files directly, you can manually insert the Madlitics snippet into your site’s header.php file. This method gives you full control, but if you ever update your theme, you may need to re-add the code.

  1. Log in to your WordPress dashboard.
  2. Navigate to AppearanceTheme File Editor.
  3. In the list of theme files on the right, click header.php.
  4. Locate the opening <head> tag.
  5. Paste your Madlitics code snippet () directly after the <head> tag
  6. Click Update File to save your changes.

Heads up: If you update or change your theme, you’ll need to manually repeat this step. Theme file updates can overwrite custom code.

For technically confident users, this option is direct and effective — just make sure you’re comfortable working inside theme files.


C. Add code directly to the header.php file of your theme.

Option D: Using Google Tag Manager

Works for all versions of wordpress — wordpress.com, worspress.org
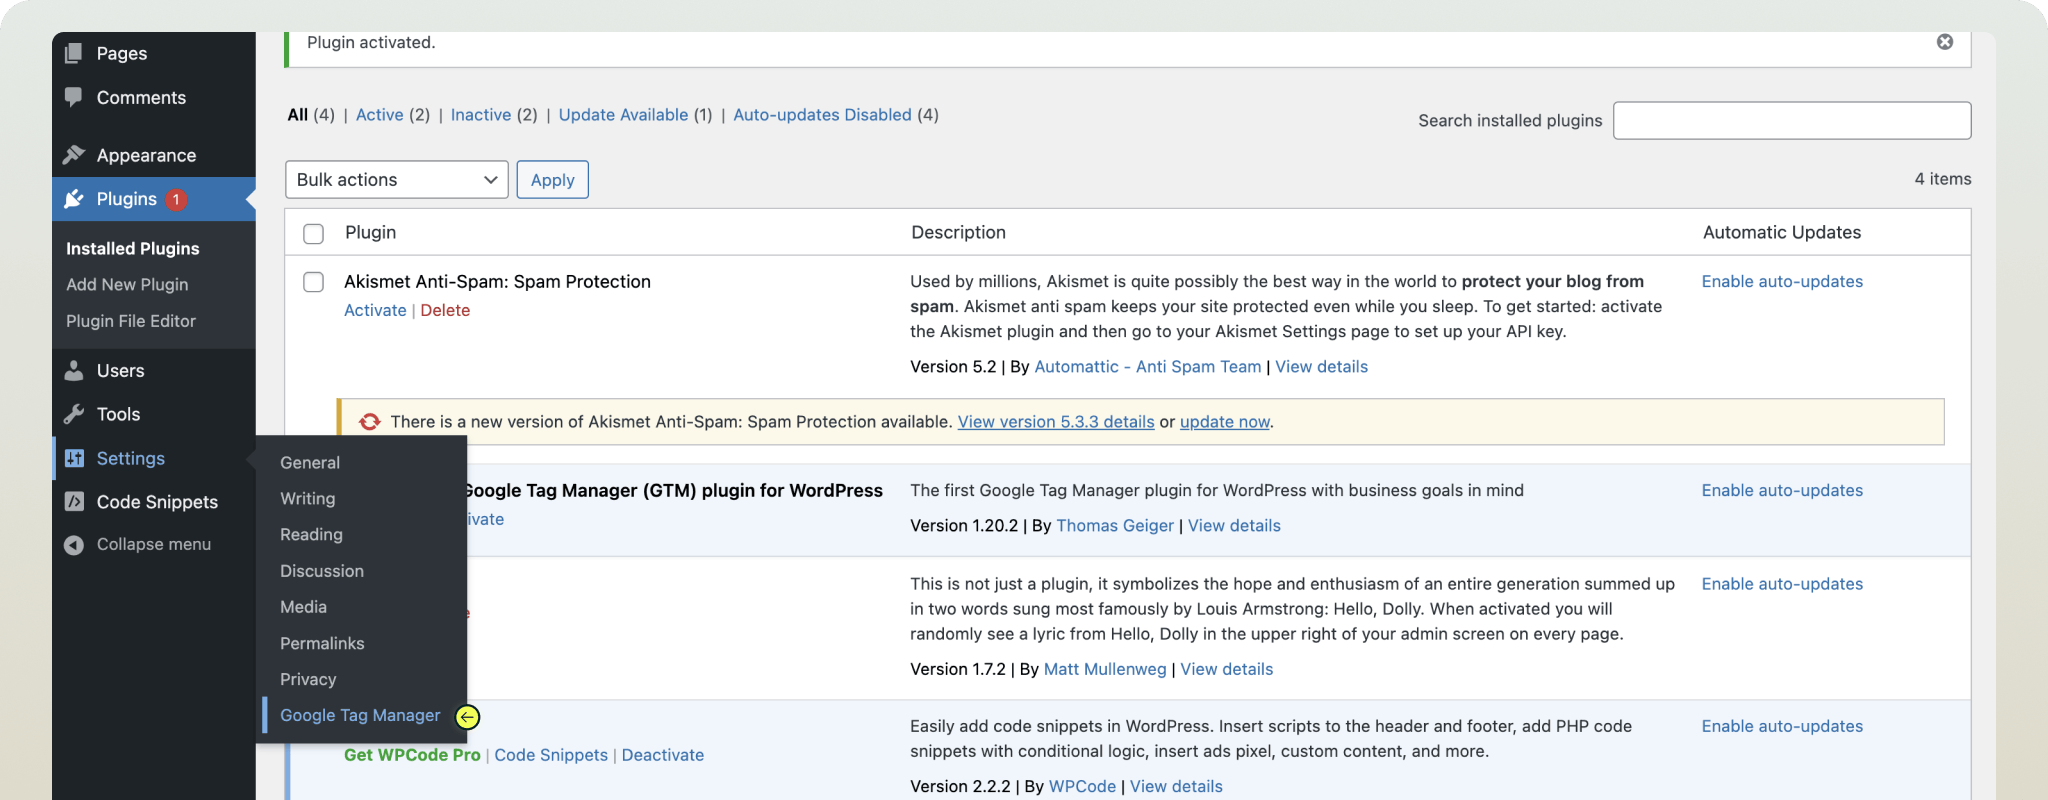
If you’re already using Google Tag Manager (GTM) to manage your tracking codes, you’re in great shape. GTM lets you easily add the Madlitics snippet without touching your WordPress theme or installing additional plugins. With GTM, you can centralize all your tags — including Madlitics — and keep your site’s code clean and organized. Plus, it makes future updates a breeze, since you won’t need to log into WordPress every time you want to tweak or add tracking.

Want to go this route? We’ve got a step-by-step guide to walk you through the entire process:
Follow our Google Tag Manager setup guide →

Heads up: To use GTM on a WordPress.com site, you’ll need to be on the Business plan or higher to install the necessary GTM plugin.


D. Once installed, Google Tag Manager will show up in your WordPress plugin list, ready for setup.

Verifying your Madlitics installation
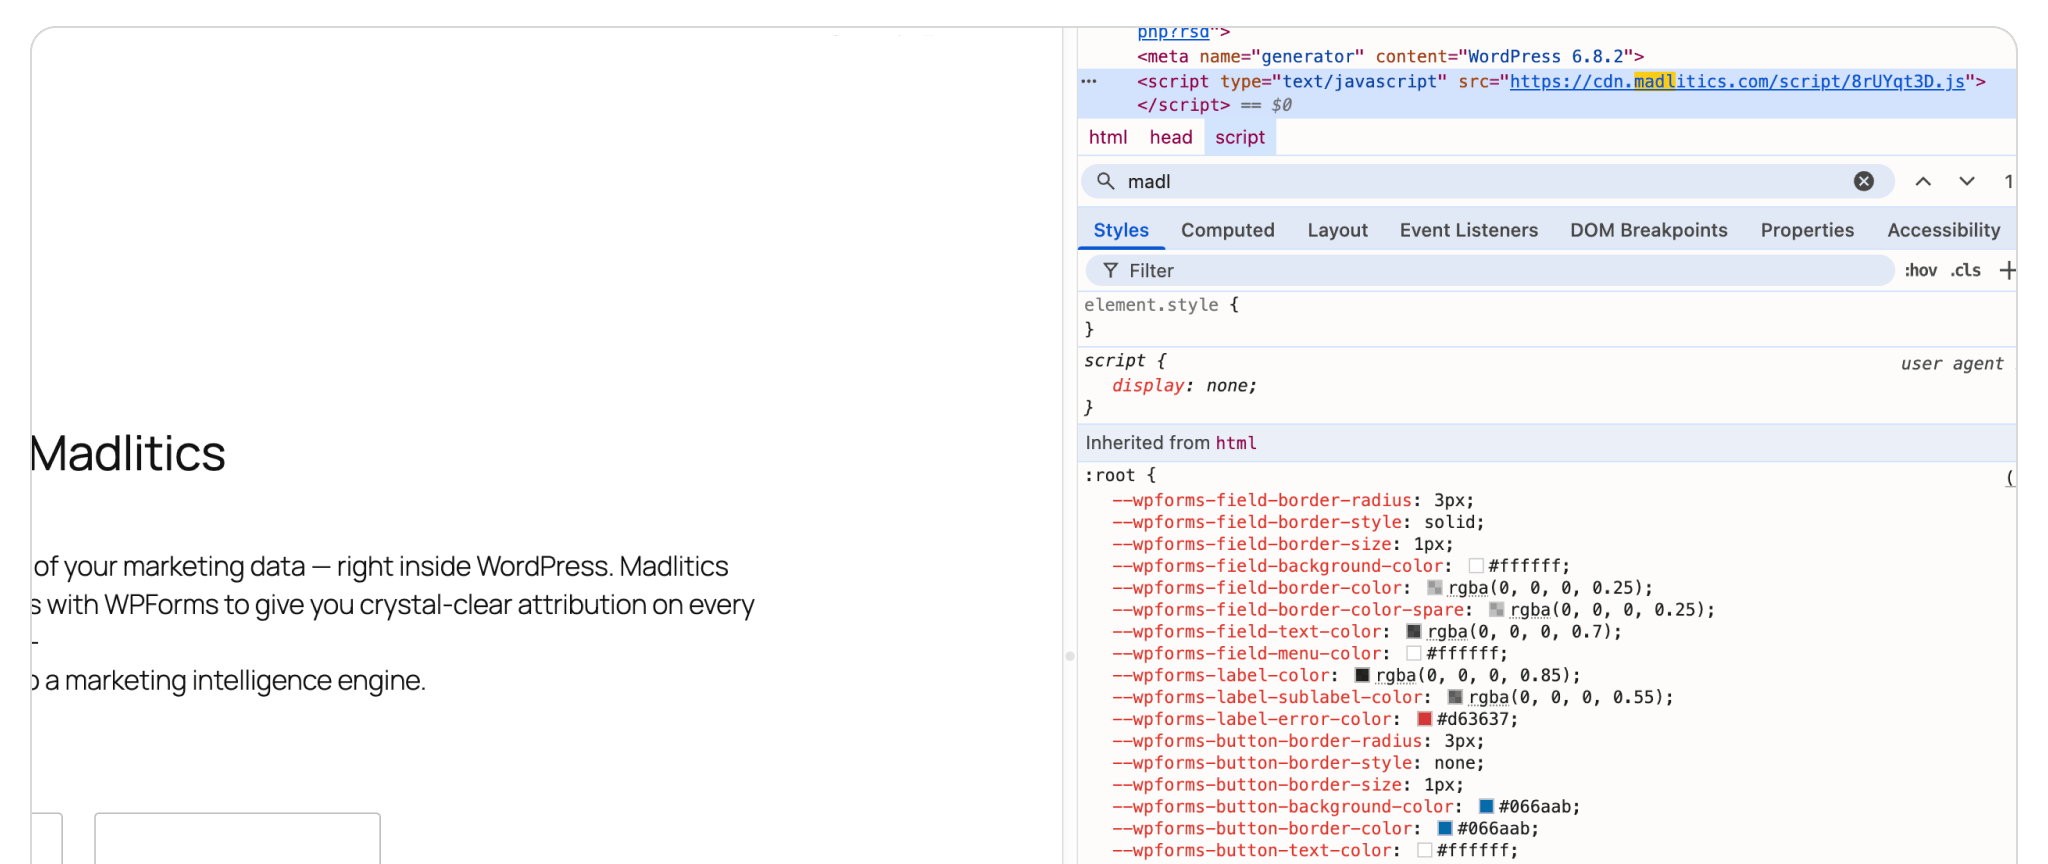
To confirm your installation, open your site in a browser and right-click anywhere on the page, then select Inspect (or use Cmd + Option + I on Mac / Ctrl + Shift + I on Windows). In the Elements tab, scroll to the <head> section and look for your code snippet — such as the madlitics.com script URL. If it’s there, your injection is active and ready to collect data.


Confirm Madlitics snippet can be found in the <head> tag.
Madlitics multi-channel attribution visualization, showing marketing platforms like TikTok, Instagram, Google, and Facebook. The graphic highlights how different sources contribute to high-performing marketing channels.
1. Add UTM parameters to all inbound links
Any marketing effort that drives traffic — whether it’s a paid ad, an email campaign, or an organic post — should have properly structured URLs that clearly define the visitor’s origin. Setting it up is a straightforward process that starts with ensuring all inbound links include UTM parameters.

A LinkedIn campaign, for example, might link to:
https://yoursite.com/?utm_source=linkedin&utm_medium=paidsocial&utm_campaign=q1_promo
Screenshot of a form builder interface with a highlighted 'Hidden Input' field. Accompanied by text explaining how to install and set up Madlitics by adding hidden fields to capture marketing attribution data.
2. Add hidden fields
Once you’ve added UTM tracking to your inbound links, the next step is to install Madlitics on your site and update your Framer Forms to include hidden fields that will store attribution data when a visitor submits a form automatically. Hidden fields to include:
• Channel (e.g., Paid Search, Organic Social, Direct)
• Segment 1 (Platform name: Google, LinkedIn, Twitter)
• Segment 2 (Campaign name)
• Segment 3 (Ad group, offer name, or post type)
• Segment 4 (Creative type or ad variation)
• Landing page/group (Tracking & first-touch attribution)
CRM interface showing a detailed view of captured attribution data, including marketing channels, segments, and landing pages. A business profile of a lead is displayed, highlighting how Madlitics enriches lead data for sales and marketing teams.
3. Utilize attribution data
With the setup complete, every form submission in Framer now carries full attribution data, ensuring accurate insights into where leads originate. Pass this data to your CRM, analytics tools, or marketing automation platforms to track performance, refine campaigns, and optimize marketing efforts with precision.

Adding Madlitics to WordPress is more straightforward than it might seem. Whether you use a plugin, your theme’s settings, or a manual edit, you have multiple reliable ways to get the snippet added — and once it’s in place, you’ll be collecting clean, first-party attribution data automatically. If you’re not sure which option is best for you, we recommend starting with the WPCode plugin. It’s beginner-friendly, quick to set up, and keeps your code safe even if you update or switch themes later.

No matter which method you choose, you’re now ready to start using Madlitics to make smarter, data-backed marketing decisions.

Put attribution data to work
Sync, analyze, and automate — turn insights into action.
Automation icon indicating hands-free marketing attribution and data flow.
Sync with your CRM
Pass UTM parameters into Salesforce, HubSpot, or ActiveCampaign so your sales team knows exactly where every lead came from — no more guessing.
Analytics report icon, indicating data insights and reporting.
Built smarter reports
Use Google Sheets, Looker Studio, or Airtable to create data-driven reports that reveal which campaigns drive real revenue — helping you make informed budget decisions.
Impact measurement icon, symbolizing marketing effectiveness.
Track revenue impact
Sync UTM data with Stripe, PayPal, or Chargebee to see which campaigns generate paying customers, not just leads — so you can scale what works.
Personalization icon, representing customization features.
Personalize email campaigns
Trigger personalized email flows in Klaviyo, Mailchimp, or ConvertKit based on a lead’s original source — ensuring the right message reaches the right audience.
Visualizing your marketing impact
See how attribution data translates into actionable insights.
Stacked bar chart showing lead generation by marketing channel over time, comparing sources like Paid Search, Paid Social, Organic Search, Direct, and Email. Helps visualize which channels drive the most traffic.
Leads by channel
See how different marketing channels contribute to lead generation over time. Understand which ones drive the most traffic and whether your marketing mix is balanced. Shift your budget toward the highest-performing channels to maximize results.
Stacked bar chart illustrating lead volume across different marketing campaigns, including Black Friday, Retargeted, Spring Promo, Referral, and SEO. Highlights trends in campaign effectiveness.
Leads by campaign
Track inbound leads across all campaigns, whether or not they have UTM parameters. Ensure every lead is categorized correctly, including Organic and Referral traffic. Use this insight to refine messaging, targeting, and budget allocation for better performance.
Line chart displaying lead-to-customer conversion rates by channel, comparing Google Ads, Facebook Ads, LinkedIn Ads, Organic Search, and Email. Shows how different sources drive qualified leads over time.
Conversion rate by channel
See which channels convert leads into paying customers. Some bring buyers, while others generate unqualified leads. Focus your budget on what drives revenue.
Line chart showing revenue performance by marketing campaign, comparing Google Ads, Facebook Ads, and LinkedIn Ads. Helps identify top-performing and underperforming campaigns.
Revenue by campaign
Focus your budget on campaigns that drive revenue, not just leads. Identify top performers and optimize underperforming efforts to maximize profitability.
Everything you need for reliable lead attribution
Accurate, persistent, and automated tracking — so your campaigns perform at their best.
Performance icon symbolizing marketing campaign effectiveness and results tracking.
Outperforms basic UTM tracking
Madlitics captures, categorizes, and persists attribution data across sessions, giving you a complete, structured view of what’s working in your marketing. Say goodbye to losing attribution when users navigate your site, struggling with formatting inconsistencies, and ingored non-UTM traffic.
Capture icon indicating data collection from various marketing channels and sources.
Capture all traffic
Madlitics categorizes all inbound leads — whether they have UTM parameters or not — so every conversion is accounted for, and you won't miss out on Organic Search, Organic Social, and Referral traffic.
Routing icon representing the flow of marketing data and attribution pathways.
Attribution across pages and sessions
A LinkedIn ad click should be attributed correctly—even if the visitor signs up on a different page later. If someone clicks an ad, browses multiple pages, then submits a form later, Madlitics persists attribution data across sessions, ensuring your reports reflect true performance.
List icon representing structured marketing data, reports, or campaign breakdowns.
Cleaner, more reliable data
Duplicate UTMs and inconsistent formatting break reports and mislead teams. Madlitics cleans and organizes attribution data before sending it to your CRM, giving you accurate insights.
Target icon symbolizing precise audience targeting and marketing campaign focus
See which content converts
Attribution isn’t just about where visitors came from—it’s about what convinced them to convert. By capturing landing page data alongside UTM parameters, Madlitics shows you which blog posts, case studies, or pricing pages drive the most revenue, helping you scale content that works.
Action icon representing campaign execution, optimization, and engagement.
Transform form submissions into actionable insights
Madlitics connects marketing touchpoints to lead generation, ensuring every form submission is fully attributed — optimize ad spend by identifying high-ROI channels, refine messaging based on what content drives engagement, make data-driven decisions with clean, structured reports, and more.